
Main New Features and Improvements
Added Copy and Paste Support for Multiple Assets
You can now copy and paste multiple assets together.
This is useful when, for example, you want to combine separately created images into a single ".edg3" file.
You can use this from the “Asset right-click menu”.
Added Copy and Paste Support for Multiple Layers
You can now copy and paste multiple layers together.
The cel images contained in the layers' frames are copied as well.
If multiple motions exist, only the cels in the active motion are copied.
You can use this from the “Layer right-click menu”.
Note: Copying and pasting sprite layers is not currently supported.
Added Image Window Minimization
When using a window layout, you can now minimize image windows.

Use the “_” button on the right side of the image window's title bar.
Minimized image windows are temporarily hidden. They reappear when you activate the image from the window bar or Window menu.
Grid Settings Can Now Be Changed for Multiple Assets at Once
Grid settings and grid preset commands previously applied only to the active image asset. They can now be applied to multiple assets selected in the Asset panel at once.
You can use this from “View menu > Grid > Grid Settings” and “View menu > Grid > Grid Preset 1–20”.
Expanded Drawing Tool Preview Options
Under “Tool Preview”, you can now choose how drawing tools are previewed:
Drawing Preview
Outline Preview
Drawing + Outline Preview
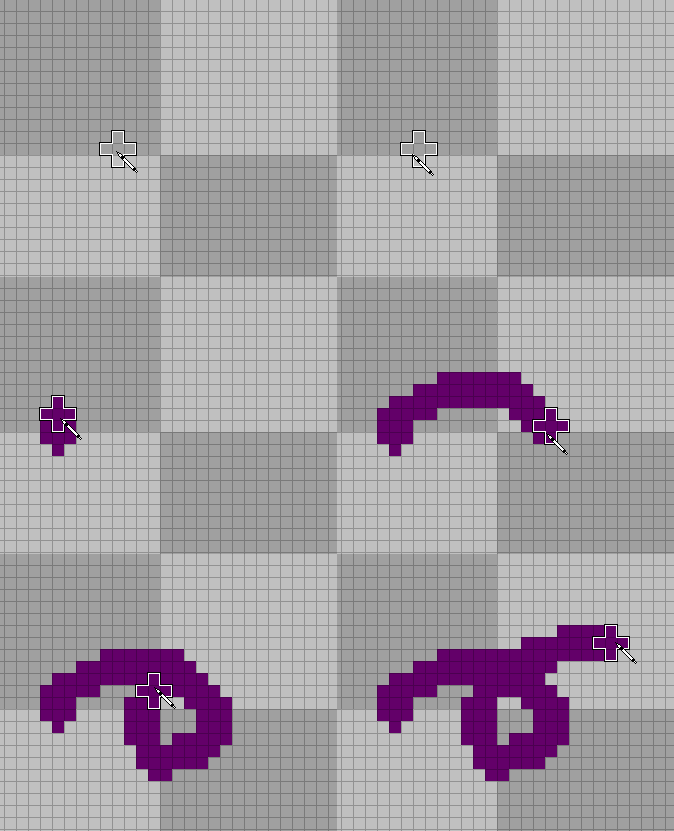
With the previous Drawing Preview, the area about to be drawn was shown using the actual drawing color, which could make it difficult to check the original colors until the cursor was moved.
Outline Preview does not fill the area with color. It shows only the outline of the area about to be drawn, making it easier to adjust the drawing position while checking the original colors.
Change this from “Options Toolbar > ▼ next to Tool Preview”.
The outline is shown at zoom levels of 4x or higher.
Note: This does not affect the Selection tools' preview.
Expanded Selection Transform Operations
Several new operation modes have been added for resizing and rotating selections:
Added a mode that lets you resize from the positions where the normal anchors would appear, even when the anchors are hidden
Added a mode that does not use the rotation anchor
Added a mode that lets you rotate by dragging around the selection
Added a function that switches to rotation while dragging with a modifier key held down
A rotation cursor is now shown while rotating.
Change these settings from “Selection Tools Options Toolbar > ▼ next to Show Resize/Rotation Anchors”.
Improved Cel Information Display and Operations
The icons shown inside cels in the Layer panel have been adjusted, making the states of “Cel Offset”, “Z-Index”, and “Opacity” easier to distinguish.
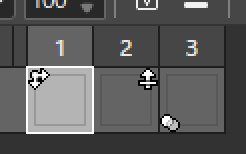
When you drag a cel to move or copy it, the cel offset, Z-Index, and opacity are now moved or copied along with the cel image.
Cel Offset, Z-Index, and Opacity Can Be Added to Toolbars
You can now add “Offset”, “Z-Index”, and “Opacity” for cels using the toolbar customization feature.
When you frequently check or edit these values, adding them to a toolbar can be useful.
There is no dedicated toolbar for these items. Add them to any toolbar you want to use.
Added “Initialize Cels”
The new “Initialize Cels” feature resets cels to their initial state at once.
It performs the following operations:
Unshares the cels
Clears the cel images
Resets Z-Index to its initial value
Resets the cel offset to its initial value
Resets opacity to its initial value
Use this when you want to reset the contents of cels and start over.
You can use it from the “Cel right-click menu > Initialize Cels”.
Added a Command to Select the Layer at the Cursor Position
A new command switches the active layer to the visible layer at the mouse cursor position.
You can use it from “Layer Panel Menu > Layer > Layer Selection > Select Layer at Cursor”.
Important Specification Changes
Changed the Behavior of “Add Frame”
The behavior of “Add Frame” in the Layer panel has changed.
Previously, it generally duplicated the contents of the reference frame.
Starting with v0.9.15, the behavior depends on the layer settings:
Normal image layers: Adds a new empty cel
Layers with “Share Cels When Adding Frames” enabled: Adds a frame sharing the previous cel
The separate “Duplicate Frame” feature has been added for cases where you want to duplicate the frame contents as before.
If you were using “Add Frame” to duplicate frame contents, please assign a shortcut to “Duplicate Frame” or add it through toolbar customization.
Changed How Horizontal and Vertical Flips Work for Selections
The behavior of horizontal and vertical flips has changed when a selection is rotated.
Previously, the operation order was “flip, then rotate”. For example, flipping a selection rotated 90 degrees horizontally could appear to flip it vertically on screen.
With the new behavior, the selection appears to flip in the direction specified on screen regardless of its rotation state.
This is achieved by readjusting the selection's coordinates and angle.
Other Improvements
When “Scroll” is assigned to the Shift key under “Tool Interruption”, panel-specific operations using Ctrl, Shift, or Alt now take priority in panels such as the Layer panel. This enables operations such as multiple selection with Shift-click.
Added “4:5” to the pixel aspect ratio options.
Bug Fixes
Fixed an issue where Tab could move focus between text boxes on a toolbar, but could not move focus to items that display sliders, such as Opacity.
Fixed an issue where multiple selected items could not be dragged in the toolbar customization dialog.
Fixed cropping when cel offsets or group offsets are in use so that the displayed result is preserved correctly after cropping.