
Pre-Deployment Checklist (FAQ)
Dear Operators,
You've made it to a significant stage of our Security Brief series! We know that this step—diving into your BIOS—can feel intimidating. But we promise, the configuration is the single most important action you can take to secure your account and ensure Delta Force remains the fair, competitive battleground you deserve.
Enabling DMA Shield and Secure Boot completes our digital fortress, shutting the door on deep-level cheats for good. This configuration guarantees ACE can provide you with the clean and safe gaming environment. Let's finish the checklist together.
DMA Shield (An Enhanced Hardware DMA Protection)
Getting the Facts Straight & Reassurance
We know that receiving a security prompt can be concerning. This part addresses the immediate pop-up you received, clarifies the security team's motivations, and confirms why these steps are necessary even if you don't cheat.
Q1: Why am I receiving the error message "DMA Shield" not enabled?
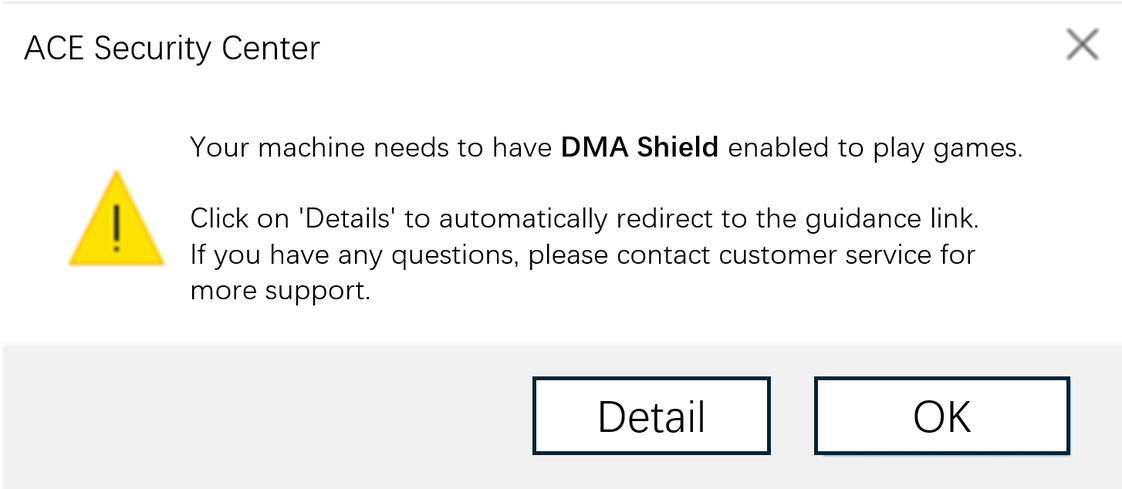
Answer: This message indicates that your system has not activated the necessary hardware features (VT-d for Intel, IOMMU for AMD) that allow ACE to deploy its high-security DMA Protection shield. You simply need to enter your computer's BIOS settings and manually enable this feature.
Q2: Why does the security team require these system changes?
Answer: To maintain a fair and clean game environment, the security team must gain control over system mechanisms that cheats actively exploit. Some advanced cheats hide behind system protections or third-party software to gather game data undetected and evade security checks. By controlling this low-level layer, we eliminate their hiding spots.
ACE Recommendation: For maximum security, we advise against running unnecessary third-party software while playing Delta Force.
Q3: I don't cheat. Why is this required of me? Is my account flagged?
Answer: This is a proactive defense protocol. To prevent external programs from exploiting system vulnerabilities, the security system may require enabling DMA hardware protection for accounts that show potential signs of an abnormal login environment or security risks (based on historical login devices, network changes, etc.). This measure is preventative and significantly boosts your account protection, minimizing the risk of your credentials being maliciously exploited by others.
Account Security Protocol: We strongly recommend you reduce account sharing, promptly modify your password, and avoid frequent network environment changes that could bring risk to your account.
Put on the Shield
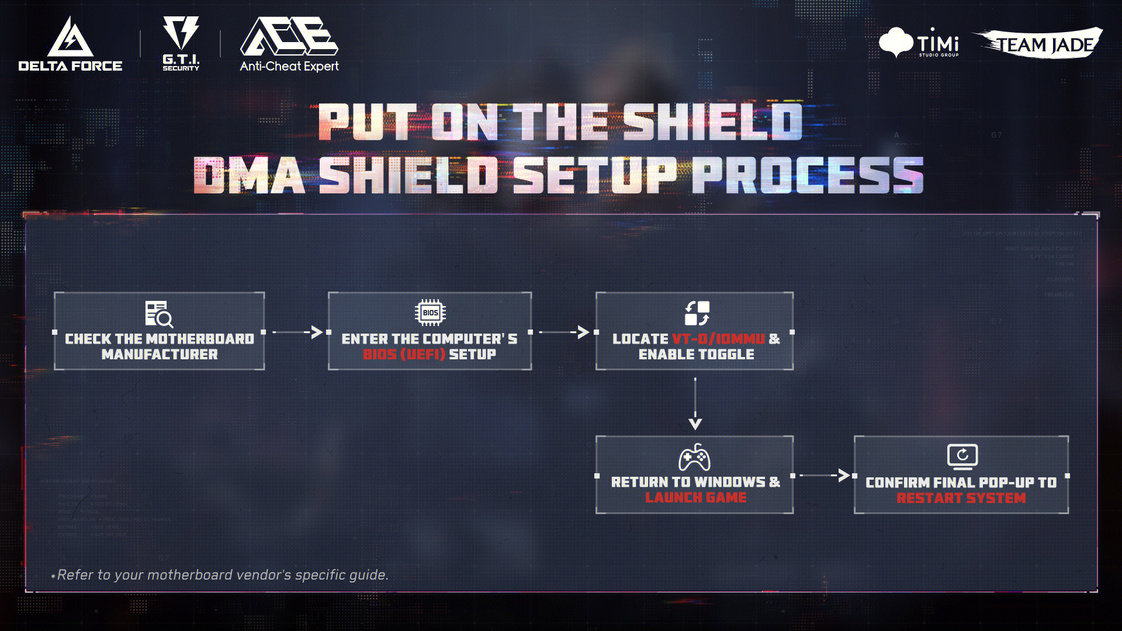
This section provides the necessary intelligence—identifying your hardware and the steps required to access the system settings. Here is a flow chart to help you better understand the process of initiating DMA Shield.
Q4: Before entering the BIOS, how do I check my motherboard manufacturer?
Answer: Use this simple recon protocol:
1. Press the Windows Key + R.
2. Type msinfo32 and hit Enter.
3. Look for "MotherBoard Manufacturer" or "System Manufacturer." This information determines your BIOS entry key and navigation path.
Q5: How do I enter my computer's BIOS (UEFI) setup?
Answer: You need to rapidly tap or long press the "Entry Key" as soon as the screen lights up after a restart (before Windows loads), see typical entry keys for motherboards developed by different manufacturers.
Manufacturer | Typical Entry Key |
ASUS | F2 or DEL |
Gigabyte | F12 or DEL |
MSI | DEL |
HP | F2, F10 (Laptops), F12 or ESC (Desktops) |
Dell | F2 (sometimes F12) |
Lenovo | F2 or Fn+F2 (F1 for ThinkPads) |
Acer / Sony | F2 (Assist for some latest Sony devices) |
Toshiba | F1 or F2 during Cold Boot |
IBM/ThinkPad | F1 during Cold Boot |
Note: If you are still not able to enter BIOS setup, please contact your motherboard manufacturer and check on its specifications for BIOS entry.
Q6: I am in the BIOS. What are the specific settings I need to change for VT-d / IOMMU?
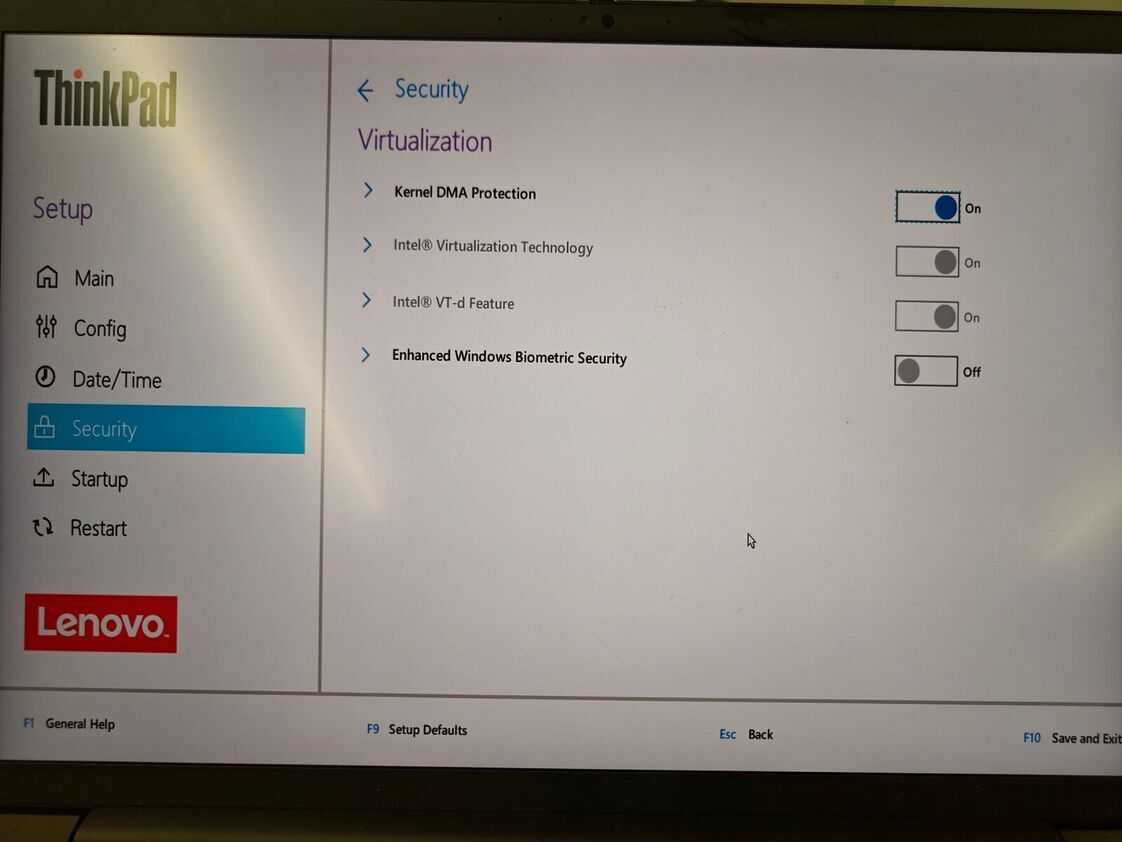
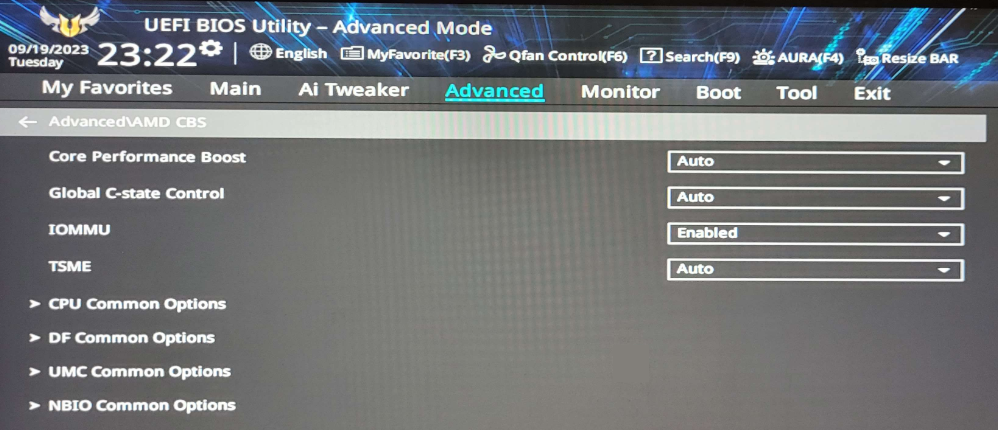
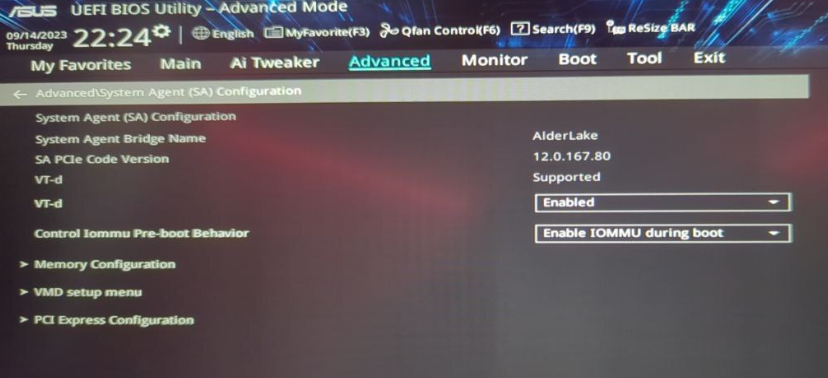
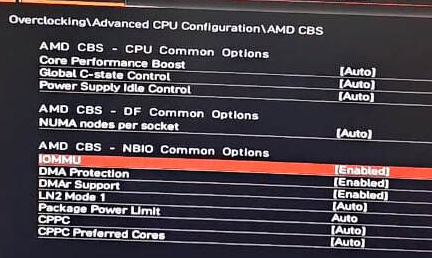
Answer: Find your manufacturer and CPU type below. You are looking for a feature named VT-d or IOMMU where you can tick the box or enable the toggle, see specific path below.
Manufacturer | Platform | BIOS/UEFI Path and Settings |
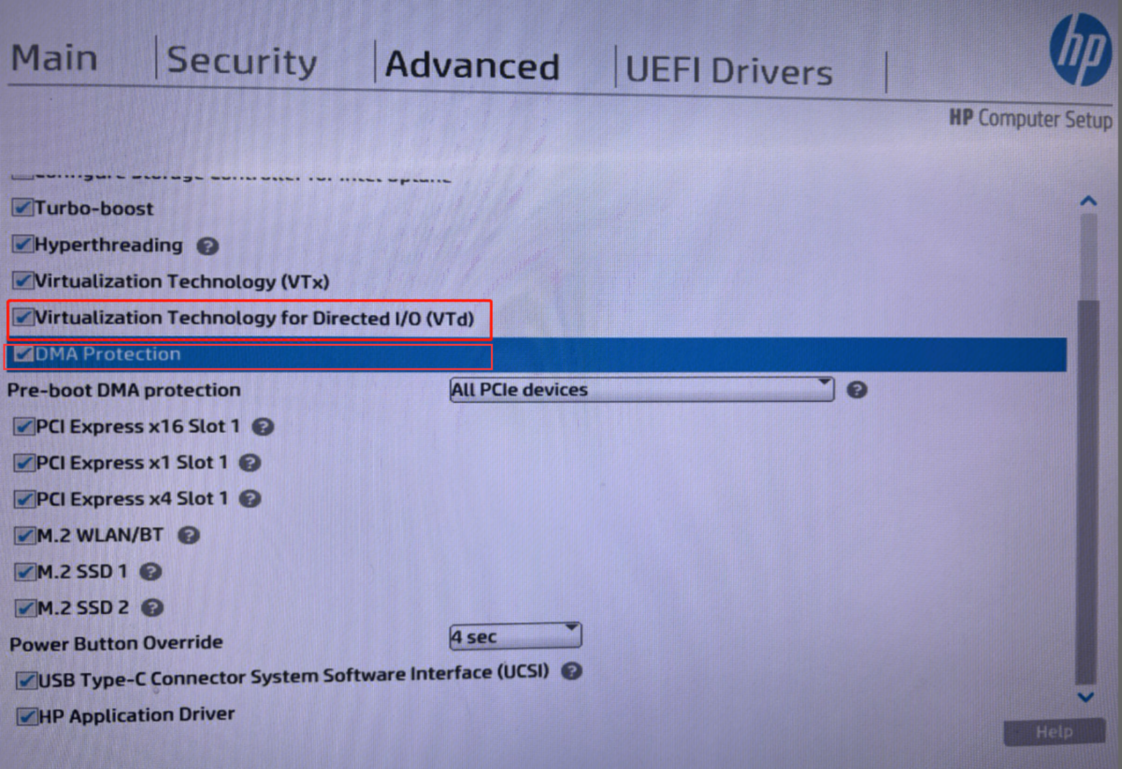
HP | Intel | Go to Advanced -> Check VT-d and DMA Protection. |
| ||
Lenovo | Intel | Go to Security -> Virtualization -> Check Intel VT-d Feature and Kernel DMA Protection. |
| ||
ASUS | AMD | Go to Advanced -> AMD_CBS -> Set IOMMU to Enabled. (Also check DMA Protection and DMAr Support in NBIO Common Options if available). |
| ||
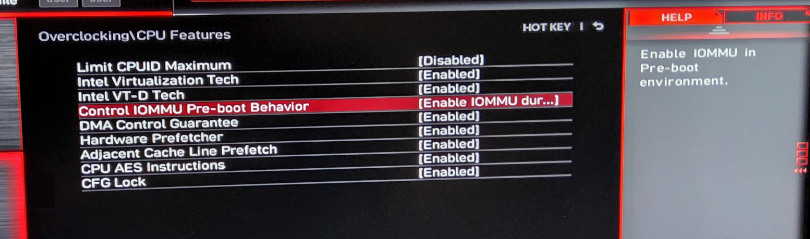
ASUS | Intel | Go to Advanced -> System Agent (SA) Configuration -> Set VT-d to Enabled. (Set Control IOMMU Pre-boot Behavior to Enable IOMMU during boot). |
| ||
MSI | AMD | Go to Overclocking -> Advanced CPU Configuration -> AMD CBS -> Set IOMMU to Enabled. (Also check DMA Protection and DMAr Support if available). |
| ||
MSI | Intel | Go to Overclocking -> CPU Features -> Set Intel VT-D Tech to Enabled. (Set Control IOMMU Pre-boot Behavior to Enable IOMMU during boot). |
|
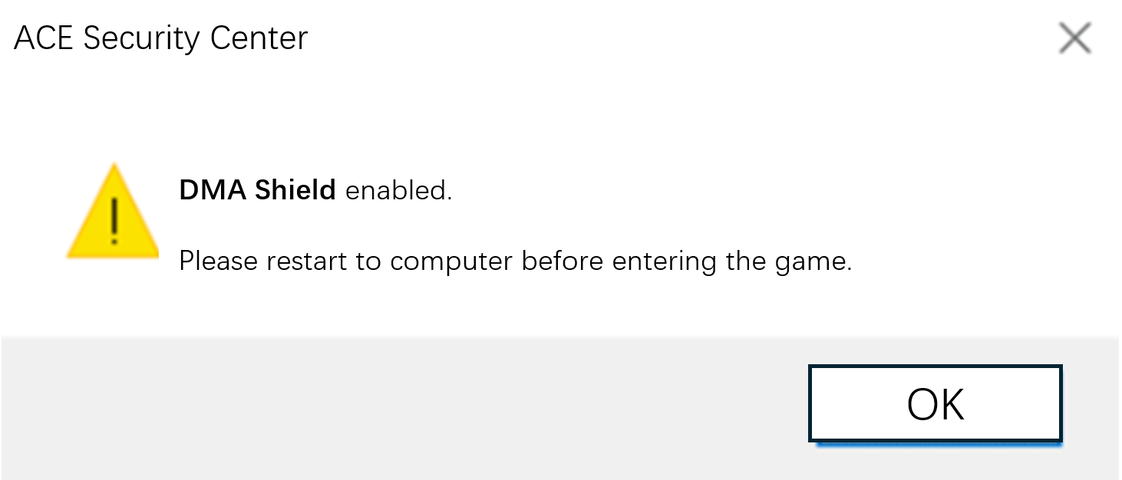
Now, return to the Windows desktop and launch Delta Force. You will receive one final pop-up confirmation. Click "Confirm" to allow the system to restart and finalize the DMA Hardware Protection activation.
 For even more detailed guide, please refer to the dedicated tutorial:
Secure Boot & TPM 2.0 (The Software Fortress)
Q7: What are Secure Boot and TPM, and do I have to enable them every time I play?
Answer: Secure Boot and TPM 2.0 are core security technologies that create a "Chain of Trust" at startup to ensure only authenticated, trusted software loads. This is a one-time setup. Once enabled, you never have to adjust these settings again.
Build the Fortress
These steps finalize your system hardening by enabling the necessary security modules. Here is another flow chart to give you a clear sense of how to build the fortress step by step.
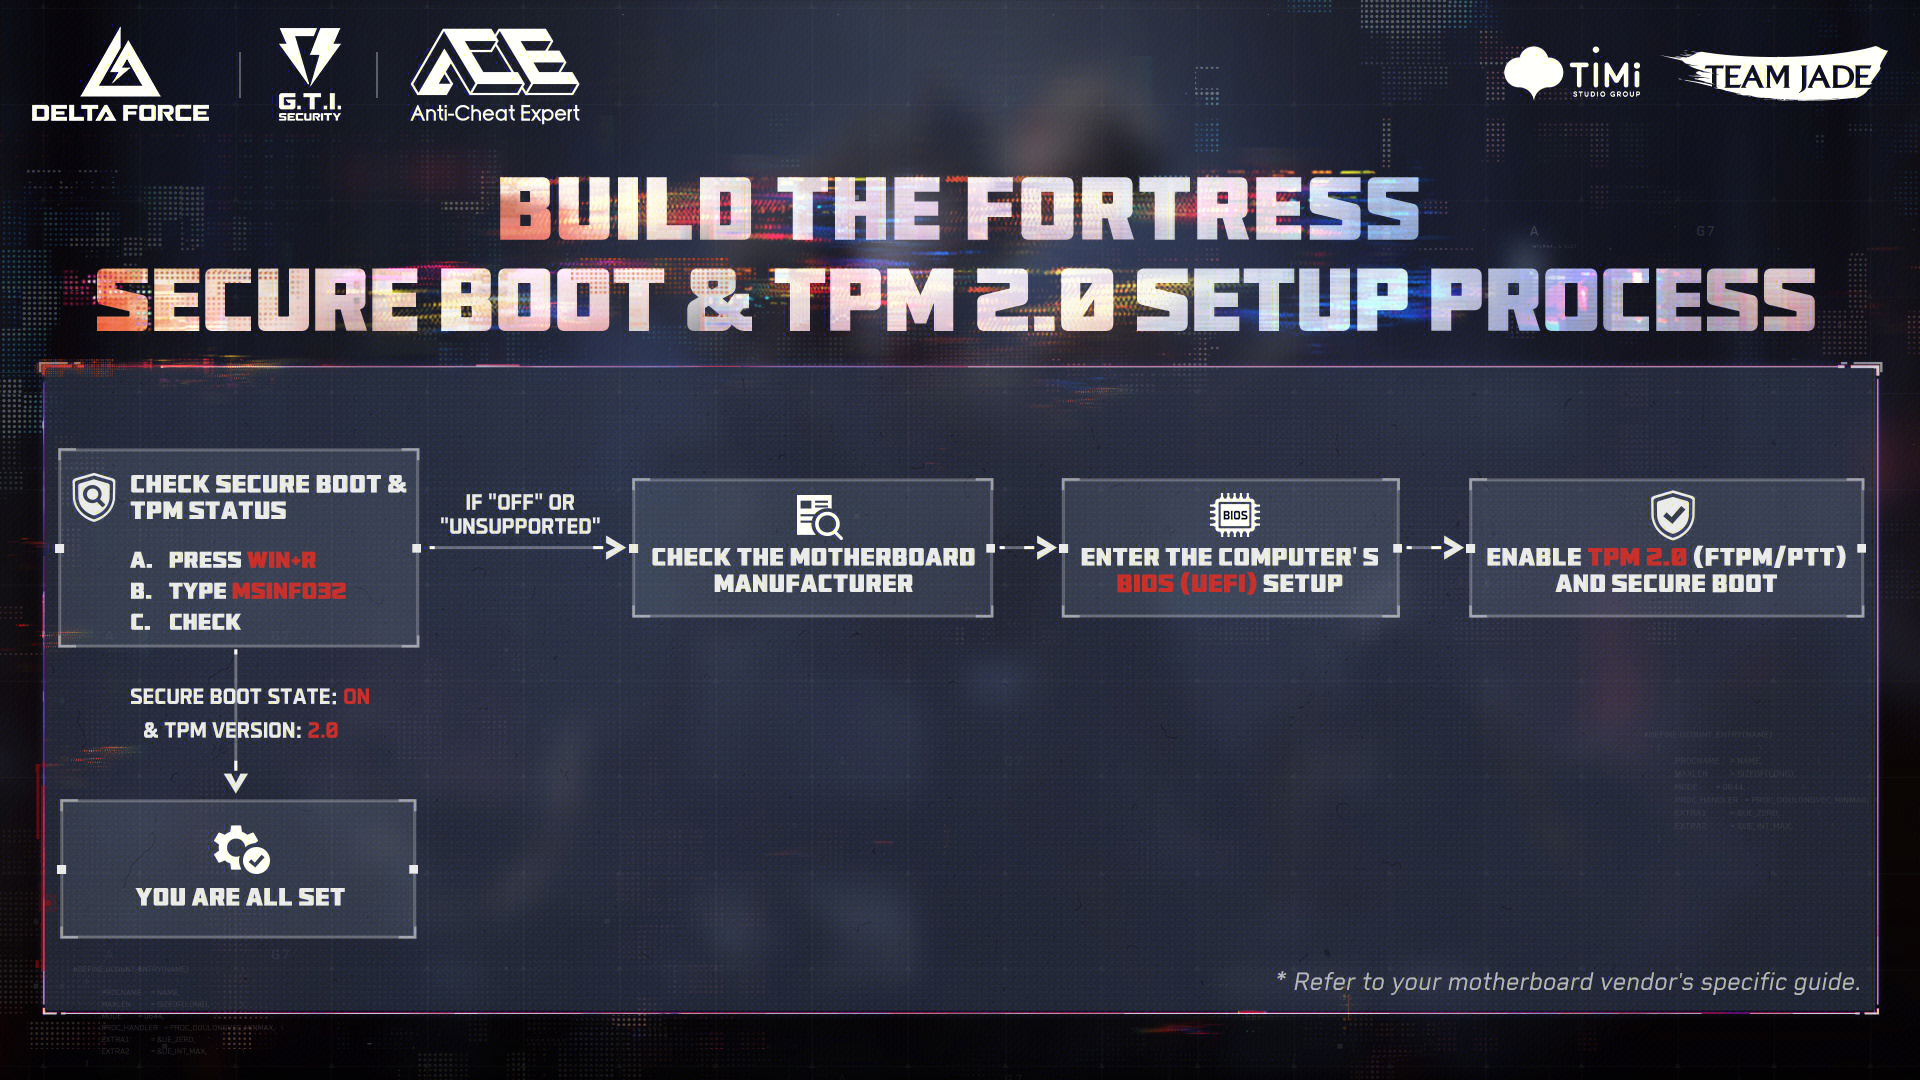
Q8: How do I check if I already have Secure Boot and TPM enabled?
Answer:
You can use the same system information tool utilized in Part 1 (Q6):
1. Press the Windows Key + R.
2. Type msinfo32 and hit Enter.
3. Look for "Secure Boot State" (should be On) and "TPM" (version should be 2.0). If they are "Off" or "Unsupported," you need to proceed with the following steps.
Q9: How do I enable TPM 2.0 (fTPM/PTT) and Secure Boot in my system?
For detailed guide to enabled TPM 2.0 and Secure Boot for various motherboards, please refer to:
For even more detailed guide, please refer to the dedicated tutorial:
Just in Case
Just in case your configuration doesn't go smoothly, we are here to provide the channels and resources to get your system green-lit.
Q10: What if the steps or menu names in my BIOS don't exactly match this guide?
Answer: BIOS menus can vary widely even between models from the same manufacturer. The paths provided serve as a strong operational reference. If you cannot find the specific options (VT-d/IOMMU, Secure Boot, TPM/PTT), please contact your motherboard service provider or consult your official motherboard manual for the exact configuration guide for your specific model.
Q11: I followed the steps, but I’m still running into issues with my BIOS settings. Where do I reach out for customer service and solutions?
Answer: We are ready to support you. We understand the complexity of PC hardware, and we value your feedback as we continue to improve our security systems. If the general troubleshooting steps do not solve your problem, please use one of the following methods to contact our dedicated support channels:
● Custom Discord Channel: Join our official Discord server and look for the dedicated #hardware-support channel for real-time community assistance.
● In-Game Customer Support:
○ Switch Mode > Customer Support > Go to the bottom of the page > CONTACT US > Scan the QR code.
● Email Support:
By completing this checklist, you have successfully deployed ACE's full defense arsenal, ensuring a fair and secure gaming environment free from the fear of hardware and memory cheats.
Operators, now deploy with confidence!