
Some players have recently reported seeing in-game prompts about kernel-level protection/hardware restriction features not being enabled (see images below).
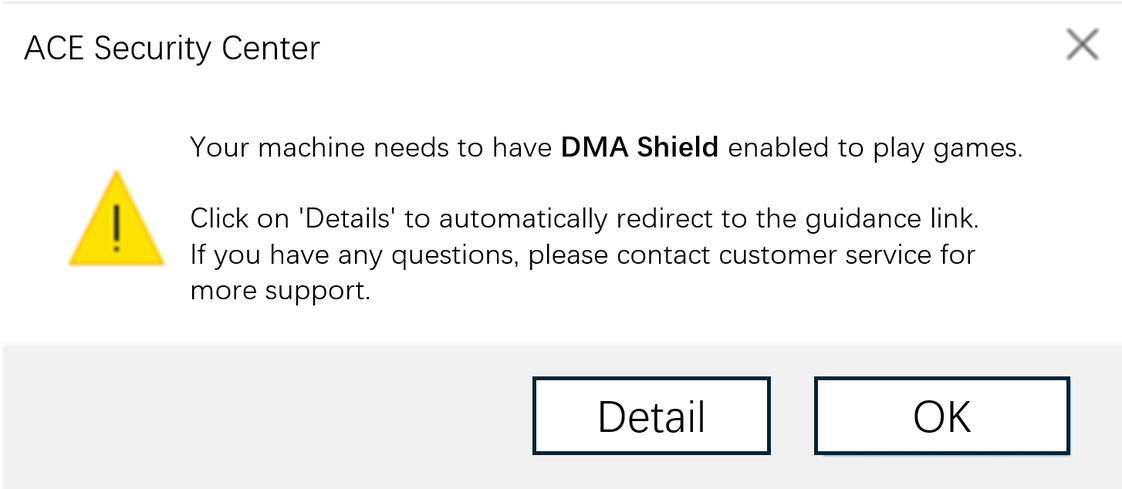
Figure 1: Kernel-level protection not enabled
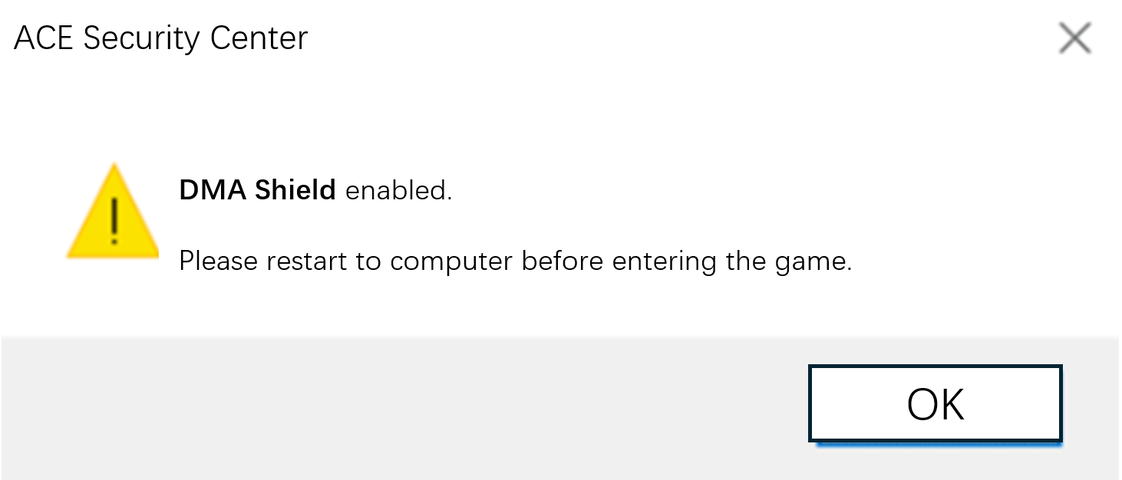
Figure 2: DMA Shield Protection
This is ACE's new DMA Shield, an enhanced hardware DMA protection feature. Building on Windows' existing "Kernel DMA Protection" security feature, it adds extra protection against unauthorized external hardware, preventing external devices from accessing memory without permission and blocking DMA attacks. This keeps your account safe from malicious exploits.
Reference: Kernel DMA Protection | Microsoft Learn
If you have received Figure 1, please follow the steps in section "1. Setup Guide for Feature 1" below.
If you have received Figure 2, please skip to section "2. Setup Guide for Feature 2" at the end, or simply restart your computer to enable the feature.
1. Setup Guide for Feature:
You need to access the BIOS page and open the corresponding options in the BIOS. Depending on your platform, the names of the switches will vary, including:
Intel platform: VT-D: Virtualization Technology for Directed I/O
AMD platform: IOMMU: Input-Output Memory Management Unit
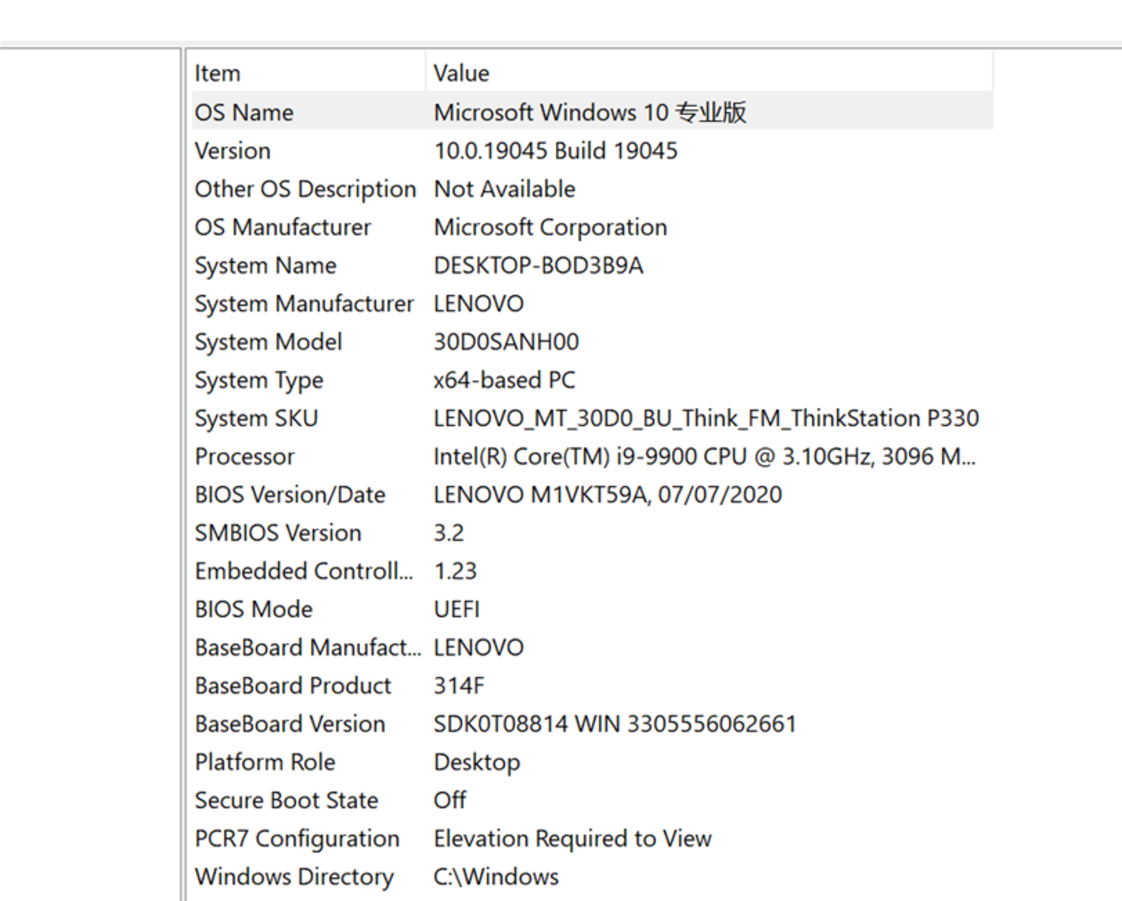
Below are BIOS access instructions for common motherboard brands. Follow the steps below to find the motherboard brand if you are not sure:
① Press Windows key + R
② Type msinfo32 and hit Enter
This will show you your motherboard brand (see image above).
Restart your computer, and when you see prompts on the boot screen, quickly press or hold the
"access key." The key varies by motherboard brand:
●ASUS: Usually F2 or DEL.
●Gigabyte: Usually F12 or DEL.
●MSI: Usually DEL.
●HP: Laptops typically use F2 or F10; desktops may use F12 or ESC.
●Dell: Usually F2, some models use F12.
●Lenovo: Usually F2 or Fn+F2, some ThinkPad models use F1.
●Acer: Usually F2.
●Sony: Usually F2, some newer models use ASSIST.
●Toshiba: F1 or F2 during Cold Boot.
●IBM/ThinkPad: F1 during Cold Boot, some newer models allow F1 during restart.
If you are still not able to enter BIOS setup, please contact your motherboard manufacturer and check on its specifications for BIOS entry.
2.1. HP Motherboard
INTEL
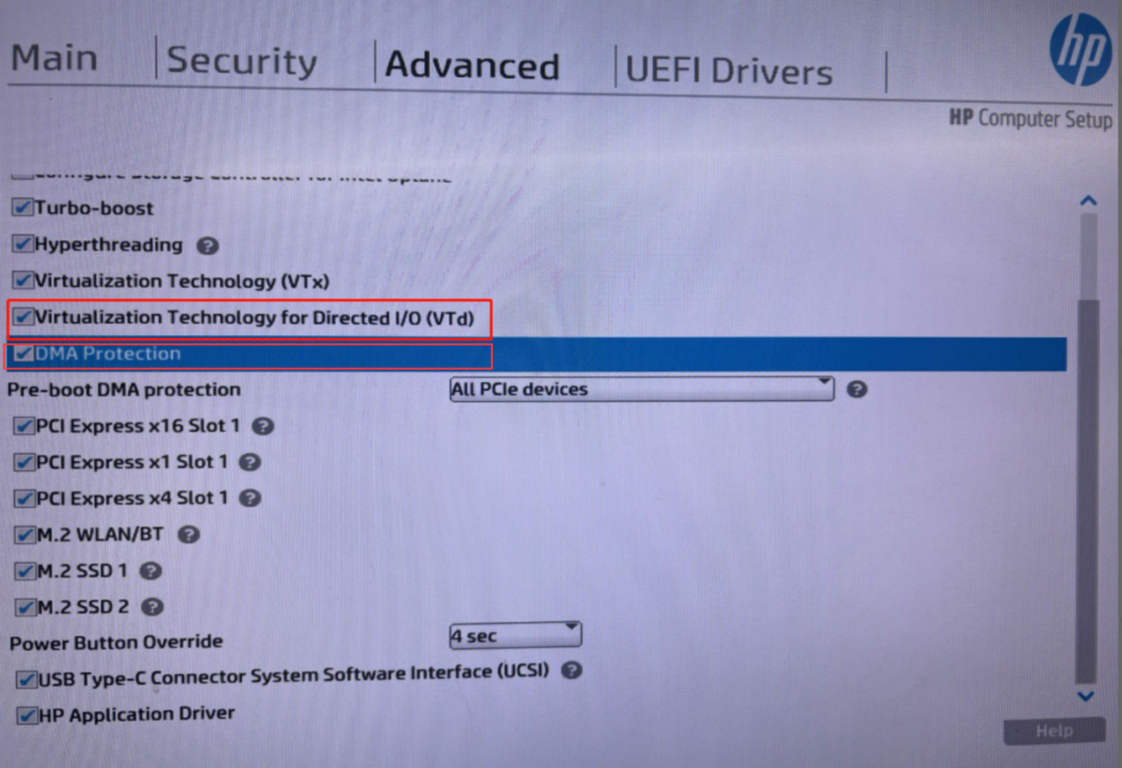
1. Enter BIOS/UEFI.
2. Go to Advanced -> Locate and enable the VT-D and DMA Protection options.
2.2. Lenovo Motherboard
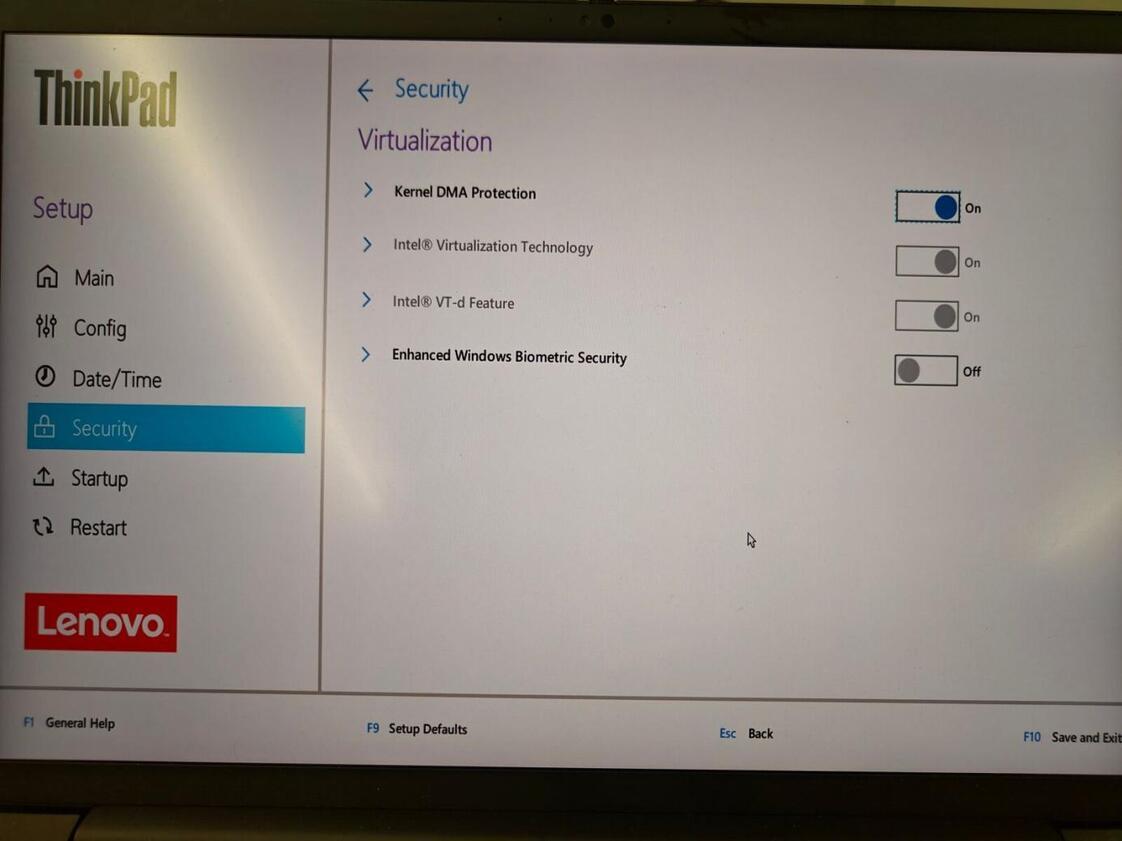
INTEL
1. Enter BIOS/UEFI.
2. Go to Security -> Virtualization -> Locate and enable the Intel VT-D Feature and Kernel DMA Protection options.
2.3. ASUS Motherboard
AMD:
1. Enter BIOS/UEFI.
2. Go to Advanced -> AMD_CBS -> Locate IOMMU and change it from Disabled/Auto to Enabled.
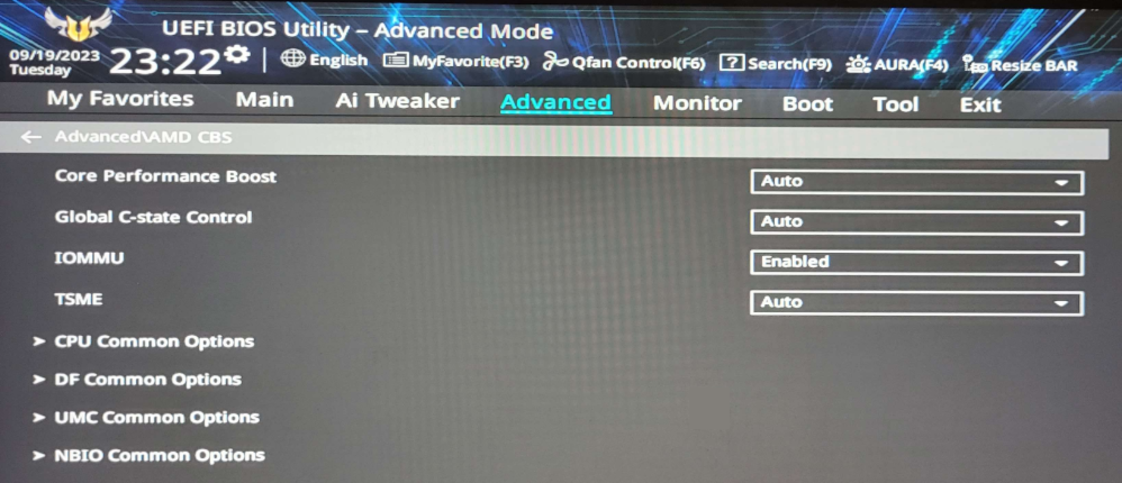
3. If you also see this option: Advanced -> AMD_CBS -> NBIO Common Options, then:
a. Change DMA Protection from Disabled/AUTO to Enabled.
b. Change DMAr Support from Disabled/AUTO to Enabled.
INTEL:
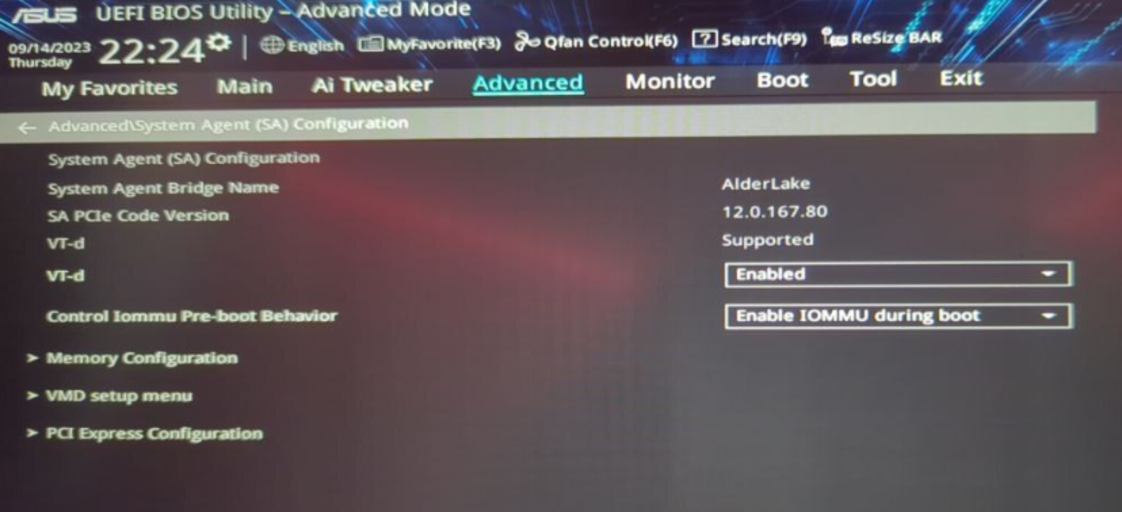
1. Enter BIOS/UEFI.
2. Go to Advanced -> System Agent (SA) Configuration.
3. Set VT-D to Enabled.
4. Set Control IOMMU Pre-boot Behavior to Enable IOMMU during boot; if that option isn't available, select Enable IOMMU.
2.4. MSI Motherboard
AMD:
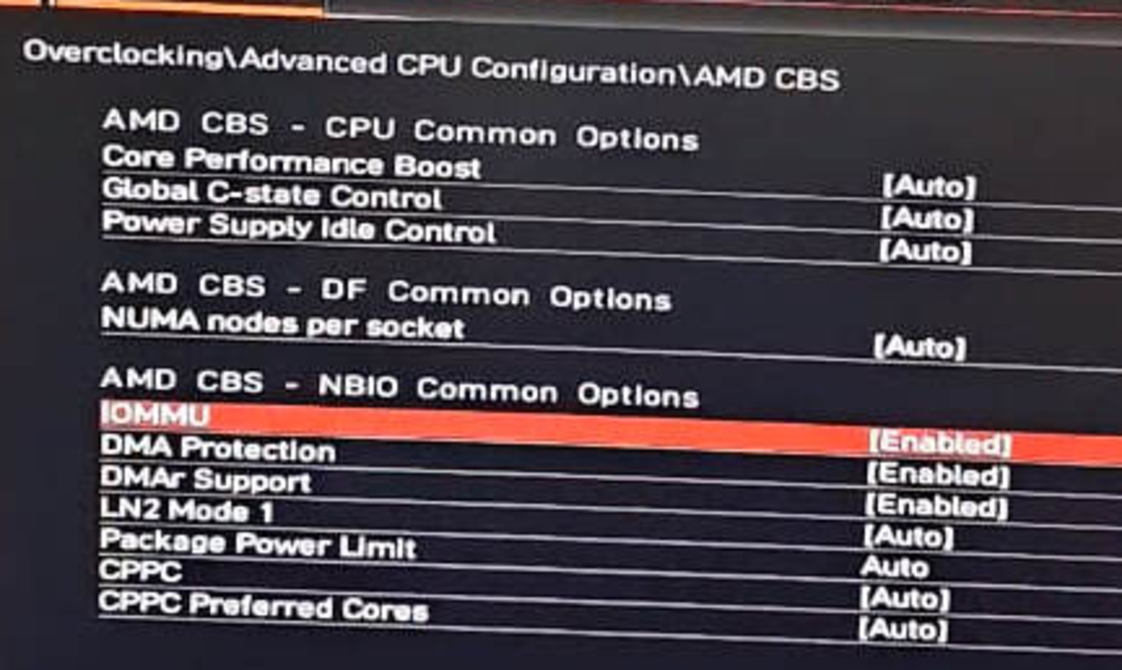
1. Enter BIOS/UEFI.
2. Go to Overclocking -> Advanced CPU Configuration -> AMD CBS.
3. Under AMD CBS -> NBIO Common Options, change IOMMU from Disabled/AUTO to Enabled.
4. If the following options are available, configure them as well:
Change DMA Protection from Disabled/AUTO to Enabled.
Change DMAr Support from Disabled/AUTO to Enabled.
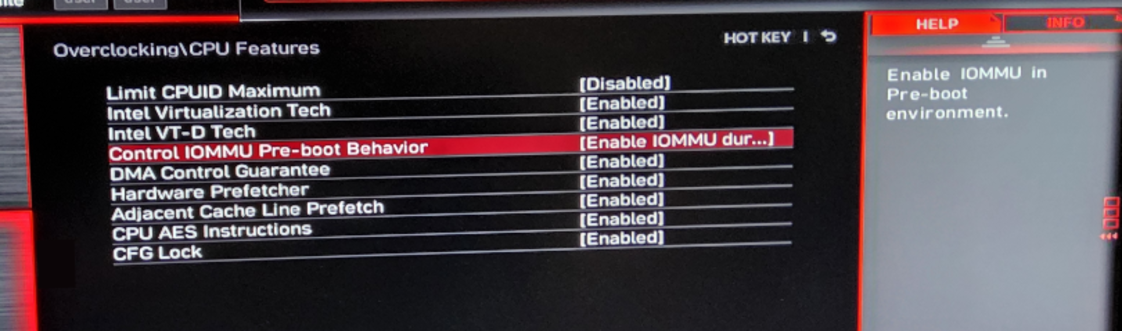
INTEL:
1. Enter BIOS/UEFI.
2. Go to Overclocking -> CPU Features.
3. Set Intel VT-D Tech to Enabled.
4. Set Control IOMMU Pre-boot Behavior to Enable IOMMU during boot; if that option isn't available, select Enable IOMMU.
Attention: Some computer manufacturers may customize BIOS pages and commands, so there may be situations where the entry keys/pages do not match the tutorial. The above content is for reference only. You can contact your motherboard service provider for further support.
2. Setup Guide for Feature:
Once you've completed the settings above, you'll see a pop-up box the next time you log into the game. (If you see this right away, it means your computer is already configured correctly.) Click "Confirm" to allow the system to restart and automatically enable "DMA Shield Protection."
Q&A:
1. Why does the security team require these system changes?
To maintain a fair and clean game environment, the security team must gain control over system mechanisms that cheats actively exploit. Some advanced cheats hide behind system protections or third-party antivirus software to gather game data undetected and evade security checks.
Security Team Recommendation: For maximum security, we advise against running third-party software while playing Delta Force.
2. I don't cheat. Why do I need to enable/disable this?
To prevent external programs from exploiting system vulnerabilities, the security system may require enabling DMA hardware protection for accounts that show potential signs of an abnormal login environment or security risks. This measure is preventative and significantly boosts your account protection, minimizing the risk of your credentials being maliciously exploited by others.
This is a proactive defense protocol based on multiple security factors, including your account's login history, devices, and network environments. We strongly recommend you reduce account sharing, promptly modify your password, and avoid frequent network environment changes that could bring risk to your account.
G.T.I. Security Team