
The Prison of Judge will be opening as part of the Half-Season event!
This new guild-exclusive dungeon offers a more challenging experience, featuring powerful enemies from Lakshtoom along with rebalanced boss encounters. Gather your guild members, prepare your strategy, and take on this high-risk, high-reward content together.
Take on the challenge and earn valuable rewards in the Prison of Judge!
What is the Prison of Judge?
Prison of Judge is a guild-exclusive dungeon that can be accessed similarly to the Forgotten Dungeon.
Monsters from Lakshtoom appear within this dungeon, featuring stronger elite variants compared to those found in the original Lakshtoom region.
Preparing for the Dungeon
To enter the Prison of Judge, the following requirements must be met:
Guild Level 5 or higher
Sealed Token of Judge
How to Obtain the Token
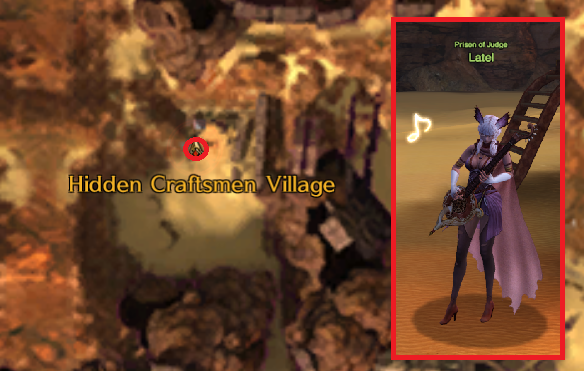
You can purchase the Sealed Token of Judge from NPC Latel, located in the Hidden Craftsmen Village in Lakshtoom.
Cost: 5,000 Fame Points
Dungeon Entry Application
Ready to take on the Prison of Judge?
Here’s how to unlock access:
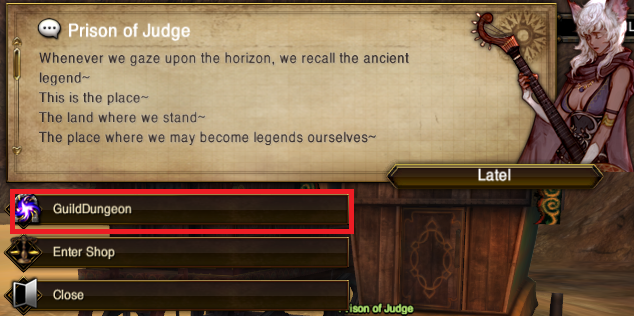
The Guild Master or a guild member with permission can apply for entry through NPC Latel.
Dungeon Rules
The Prison of Judge can be entered once per week per guild.
You can still access the Forgotten Dungeon even after completing the Prison of Judge.
Entry Restrictions
Regardless of success or failure, both the guild and participating characters cannot re-enter within the same week.
Entry limits reset every Thursday.
Important Notes
Once a guild dungeon application is submitted, it cannot be canceled.
Please coordinate with your guild members before applying.
Difficulty Selection
Now that you’ve learned how to apply for entry to the Prison of Judge, it’s time to select the appropriate difficulty for your run.
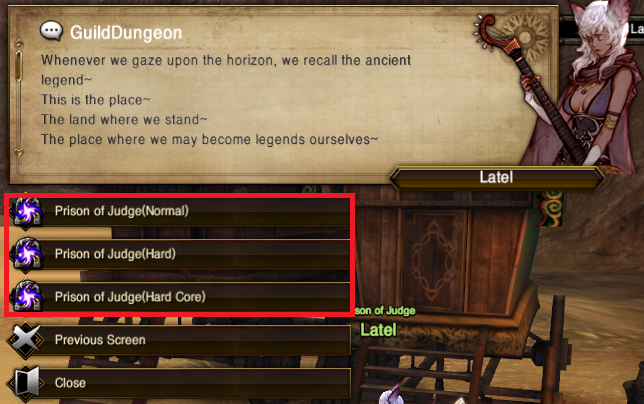
As the difficulty increases, monsters inside the dungeon become stronger and additional penalties are applied, but clearing higher difficulties will reward you with more valuable rewards.
Please refer to the details below for clear rewards and additional penalties for each difficulty level.
Difficulty | Clear Reward | Conditions |
|---|---|---|
Normal | Lakshtoom Ruler Loot Box | No EXP loss on death, Teleport available, Return available |
Hard | Lakshtoom Ruler Copper Chest | No EXP loss on death, Teleport unavailable, Return unavailable |
Hardcore | Lakshtoom Ruler Gold Chest | EXP loss on death, Teleport unavailable, Return unavailable |
Dungeon Rewards (Hard / Hardcore)
Difficulty | Item Name | Contents |
|---|---|---|
Hard | Lakshtoom Ruler Copper Chest | Lakshtoom Ruler Token x2 |
Hardcore | Lakshtoom Ruler Gold Chest | Lakshtoom Ruler Token x10 |
The “Lakshtoom Ruler Loot Box” contains the same rewards as the loot dropped by the boss “Squroom.”
Entering the Dungeon
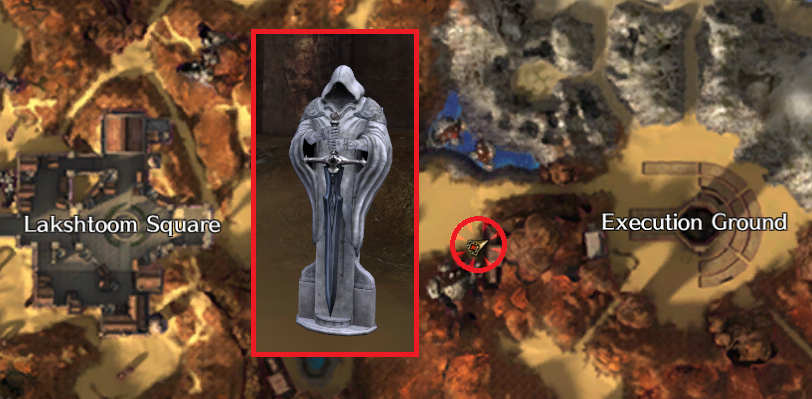
The Prison of Judge Entrance Statue is located between Lakshtoom Square and the Execution Grounds.
Before entering the dungeon, make sure to use the Sealed Token of Judge first, then proceed inside.
Once inside, the dungeon instance can only be accessed and cleared by members of the same guild.
✅ Dungeon Structure
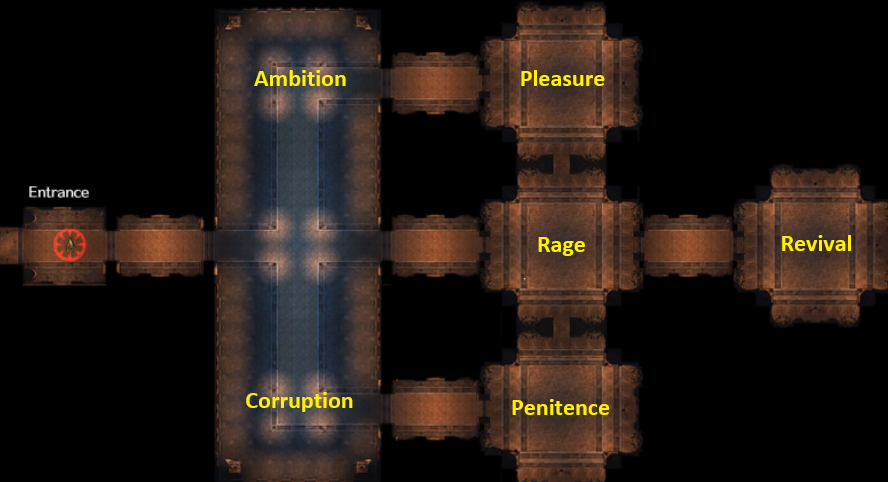
The dungeon is divided into the following areas:
Prison of Ambition
Prison of Corruption
Prison of Pleasure
Prison of Rage
Prison of Penitence
Prison of Revival
Defeat all elite monsters in each area to summon the area boss.
The final boss in the Prison of Revival will only appear after all previous bosses have been defeated.
✅ Monster Information
Each area features familiar enemies:
Area | Monster Type |
|---|---|
Prison of Ambition | Ambition-type monsters |
Prison of Corruption | Corruption-type monsters |
Prison of Pleasure | Pleasure-type monsters |
Prison of Rage | Rage-type monsters |
Prison of Penitence | Penitence-type monsters |
Prison of Revival | Revival-type monsters |
These monsters share the same appearance as those found in the Lakshtoom 2F Prison area, including bosses.
Normal Difficulty: Original bosses appear
Hard / Hardcore: Rebalanced boss versions appear
Defeat Squroom in the final area to complete the dungeon.
✅ New Equipment
Each area boss has been rebalanced to provide a greater challenge compared to standard bosses.
Loot tables for bosses in the Ambition ~ Penitence areas have been adjusted.
New equipment items have been added.
Mordred's Sword
Item Name | ATK | Effect |
|---|---|---|
+0 Blessed Mordred's Sword | 16 ~ 34 | ATK SPD +30, ACC +15 |
+1 Blessed Mordred's Sword | 17 ~ 35 | ATK SPD +30, ACC +16 |
+2 Blessed Mordred's Sword | 18 ~ 36 | ATK SPD +30, ACC +17 |
+3 Blessed Mordred's Sword | 19 ~ 37 | ATK SPD +30, ACC +18 |
+4 Blessed Mordred's Sword | 21 ~ 39 | ATK SPD +30, ACC +19 |
+5 Blessed Mordred's Sword | 23 ~ 41 | ATK SPD +30, ACC +20 |
+6 Blessed Mordred's Sword | 26 ~ 44 | ATK SPD +30, ACC +21 |
+7 Blessed Mordred's Sword | 35 ~ 62 | ATK SPD +30, ACC +22, Additional DMG to All Enemies +4 |
+8 Blessed Mordred's Sword | 42 ~ 78 | ATK SPD +30, ACC +23, Additional DMG to All Enemies +4 |
+9 Blessed Mordred's Sword | 51 ~ 96 | ATK SPD +30, ACC +24, Additional DMG to All Enemies +5 |
+10 Blessed Mordred's Sword | 61 ~ 115 | ATK SPD +30, ACC +25, Additional DMG to All Enemies +15 |
+11 Blessed Mordred's Sword | 73 ~ 136 | ATK SPD +30, ACC +26, Additional DMG to All Enemies +26 |
+12 Blessed Mordred's Sword | 85 ~ 157 | ATK SPD +30, ACC +27, Additional DMG to All Enemies +36 |
+13 Blessed Mordred's Sword | 98 ~ 179 | ATK SPD +30, ACC +28, Additional DMG to All Enemies +47 |
+14 Blessed Mordred's Sword | 112 ~ 202 | ATK SPD +30, ACC +29, Additional DMG to All Enemies +59 |
+15 Blessed Mordred's Sword | 127 ~ 226 | ATK SPD +30, ACC +30, Additional DMG to All Enemies +72 |
Blade
Item Name | ATK | Effect |
|---|---|---|
+0 Blessed Blade | 20 ~ 50 | ACC +12, Fire |
+1 Blessed Blade | 21 ~ 51 | ACC +13, Fire |
+2 Blessed Blade | 23 ~ 53 | ACC +14, Fire |
+3 Blessed Blade | 25 ~ 55 | ACC +15, Fire |
+4 Blessed Blade | 28 ~ 58 | ACC +16, Fire |
+5 Blessed Blade | 32 ~ 62 | ACC +17, Fire |
+6 Blessed Blade | 35 ~ 65 | ACC +18, Fire |
+7 Blessed Blade | 41 ~ 91 | ACC +19, Additional DMG to All Enemies +4, Fire |
+8 Blessed Blade | 49 ~ 119 | ACC +20, Additional DMG to All Enemies +4, Fire |
+9 Blessed Blade | 57 ~ 147 | ACC +21, Additional DMG to All Enemies +5, Fire |
+10 Blessed Blade | 67 ~ 177 | ACC +22, Additional DMG to All Enemies +15, Fire |
+11 Blessed Blade | 78 ~ 208 | ACC +23, Additional DMG to All Enemies +26, Fire |
+12 Blessed Blade | 90 ~ 240 | ACC +24, Additional DMG to All Enemies +36, Fire |
+13 Blessed Blade | 103 ~ 273 | ACC +25, Additional DMG to All Enemies +47, Fire |
+14 Blessed Blade | 117 ~ 307 | ACC +26, Additional DMG to All Enemies +59, Fire |
+15 Blessed Blade | 132 ~ 342 | ACC +27, Additional DMG to All Enemies +72, Fire |
Procella's Staff
Item Name | ATK | Effect |
|---|---|---|
+0 (Blessed) Prosela’s Staff | 14 ~ 24 | SP +3, MP Recovery +10, Mana Drain on Physical Attack, ACC +10, DEF +3 |
+1 (Blessed) Prosela’s Staff | 15 ~ 25 | SP +3, MP Recovery +10, Mana Drain on Physical Attack, ACC +10, DEF +3 |
+2 (Blessed) Prosela’s Staff | 16 ~ 26 | SP +4, MP Recovery +10, Mana Drain on Physical Attack, ACC +10, DEF +3 |
+3 (Blessed) Prosela’s Staff | 17 ~ 27 | SP +4, MP Recovery +10, Mana Drain on Physical Attack, ACC +10, DEF +3 |
+4 (Blessed) Prosela’s Staff | 19 ~ 29 | SP +5, MP Recovery +10, Mana Drain on Physical Attack, ACC +10, DEF +3 |
+5 (Blessed) Prosela’s Staff | 21 ~ 31 | SP +5, MP Recovery +10, Mana Drain on Physical Attack, ACC +10, DEF +3 |
+6 (Blessed) Prosela’s Staff | 22 ~ 32 | SP +6, MP Recovery +10, Mana Drain on Physical Attack, ACC +10, DEF +3 |
+7 (Blessed) Prosela’s Staff | 26 ~ 46 | SP +7, MP Recovery +11, Mana Drain on Physical Attack, ACC +12, DEF +3, Magic ATK +5, Triggers Ice Blast |
+8 (Blessed) Prosela’s Staff | 31 ~ 61 | SP +8, MP Recovery +12, Mana Drain on Physical Attack, ACC +14, DEF +3, Magic ATK +6, Triggers Ice Blast |
+9 (Blessed) Prosela’s Staff | 37 ~ 77 | SP +9, MP Recovery +13, Mana Drain on Physical Attack, ACC +16, DEF +3, Magic ATK +7, Triggers Ice Blast |
+10 (Blessed) Prosela’s Staff | 44 ~ 94 | SP +10, MP Recovery +14, Mana Drain on Physical Attack, ACC +18, DEF +3, Magic ATK +8, Triggers Ice Blast, Additional DMG to All Enemies +10 |
+11 (Blessed) Prosela’s Staff | 52 ~ 112 | SP +11, MP Recovery +15, Mana Drain on Physical Attack, ACC +20, DEF +3, Magic ATK +9, Triggers Ice Blast, Additional DMG to All Enemies +20 |
+12 (Blessed) Prosela’s Staff | 61 ~ 131 | SP +12, MP Recovery +16, Mana Drain on Physical Attack, ACC +22, DEF +3, Magic ATK +10, Triggers Ice Blast, Additional DMG to All Enemies +30 |
+13 (Blessed) Prosela’s Staff | 71 ~ 151 | SP +13, MP Recovery +17, Mana Drain on Physical Attack, ACC +24, DEF +3, Magic ATK +11, Triggers Ice Blast, Additional DMG to All Enemies +41 |
+14 (Blessed) Prosela’s Staff | 82 ~ 172 | SP +14, MP Recovery +18, Mana Drain on Physical Attack, ACC +26, DEF +3, Magic ATK +12, Triggers Ice Blast, Additional DMG to All Enemies +53 |
+15 (Blessed) Prosela’s Staff | 94 ~ 194 | SP +15, MP Recovery +19, Mana Drain on Physical Attack, ACC +28, DEF +3, Magic ATK +13, Triggers Ice Blast, Additional DMG to All Enemies +66 |
※ Blessed Prosela’s Staff Effect
The previous effects of the Blessed Staff no longer apply.
A new effect has been added:
when using “Ice Blast,” the “Tornado” skill will now be triggered.
This weapon can be obtained by defeating boss monsters in the Prison of Judge.
and due to its low drop rate, it is considered difficult to acquire.
Lakshtoom Prison Boss Difficulty Adjustment
With this update, the boss monsters in the existing Lakshtoom Prison dungeon have been rebalanced.
These bosses have now been adjusted to match the difficulty of bosses in the Prison of Judge (Hard) dungeon, making them significantly stronger and increasing the overall challenge.
If you are able to defeat the newly rebalanced prison bosses, you will be well-prepared to take on the Prison of Judge (Hard) difficulty.
We recommend studying strategies and gaining combat experience by facing the Lakshtoom Prison bosses.
We hope you enjoy the new challenge in the Prison of Judge.
Team up with your guild, test your limits, and claim your rewards.
See you in the dungeon!