How a Gas Station Works
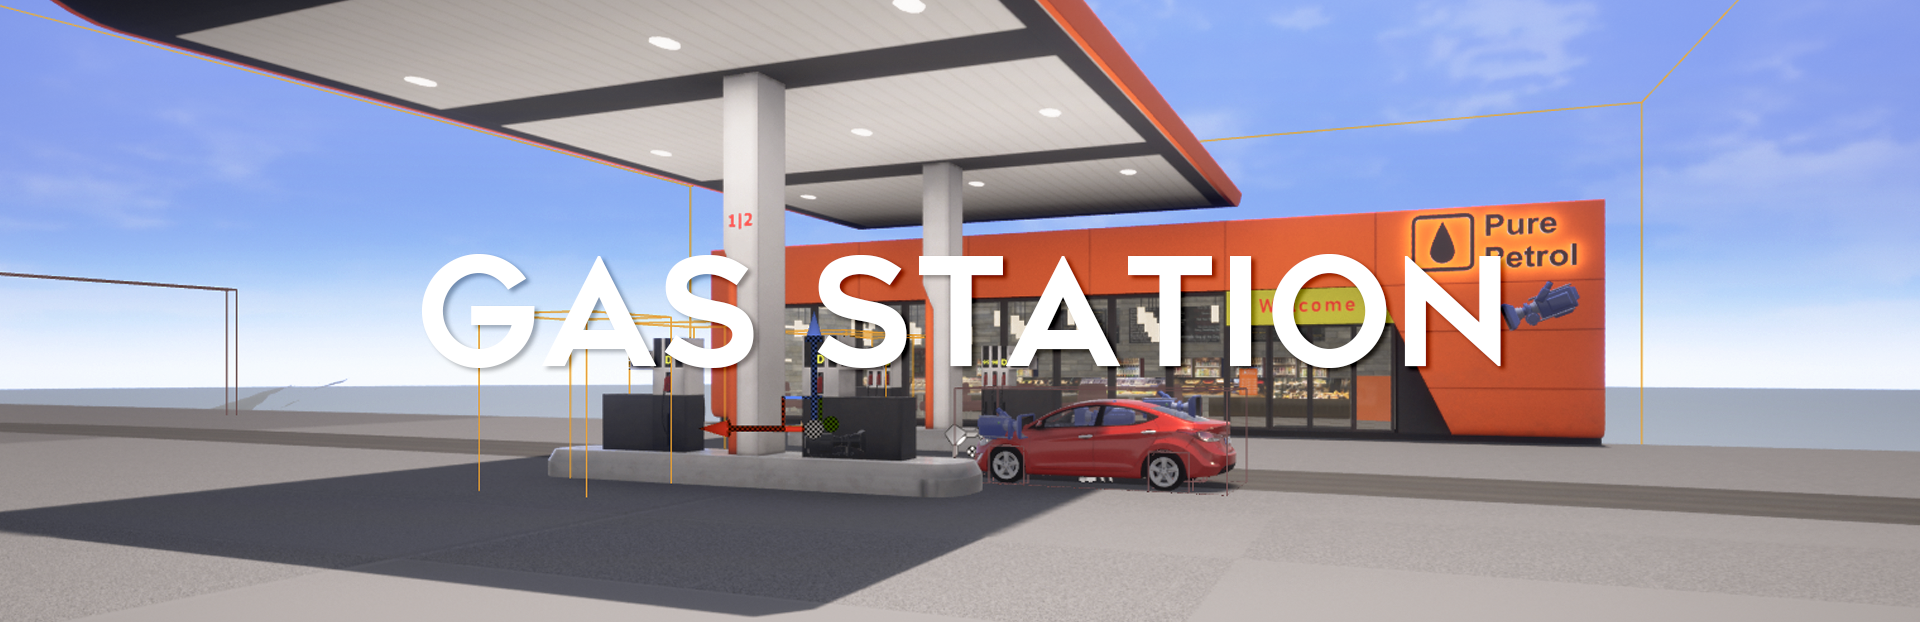
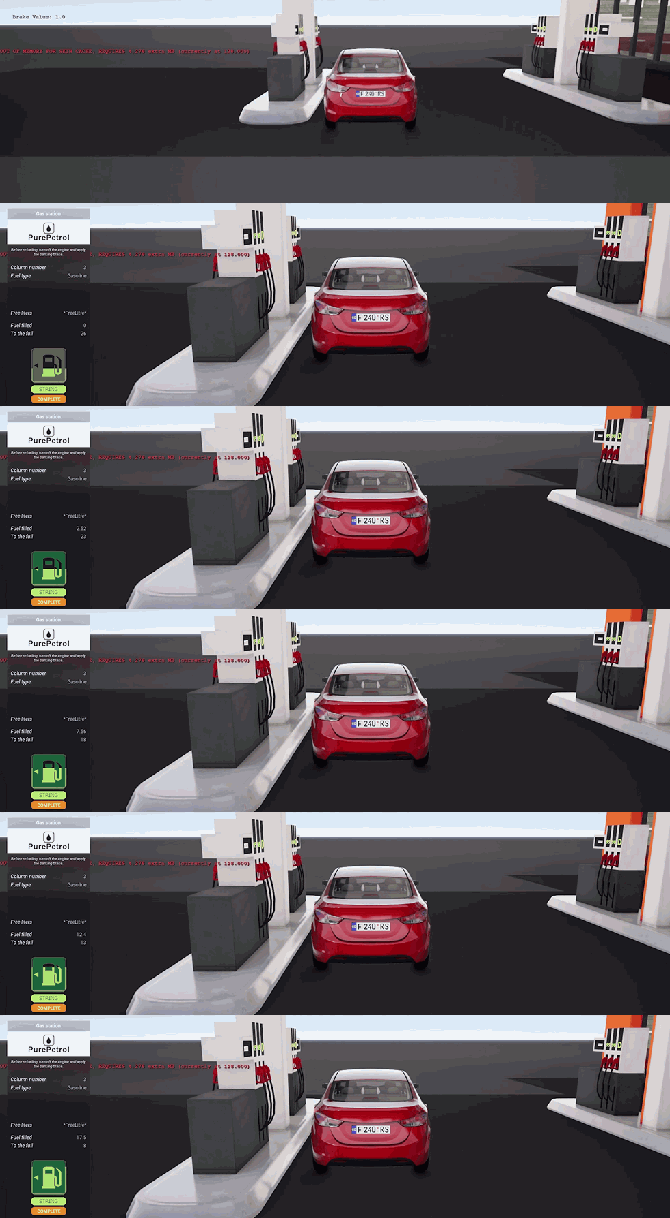
The player arrives at the gas station, drives up to the gas station they need, depending on the type of fuel and the side of the fuel tank hatch, the Overlap event is triggered.
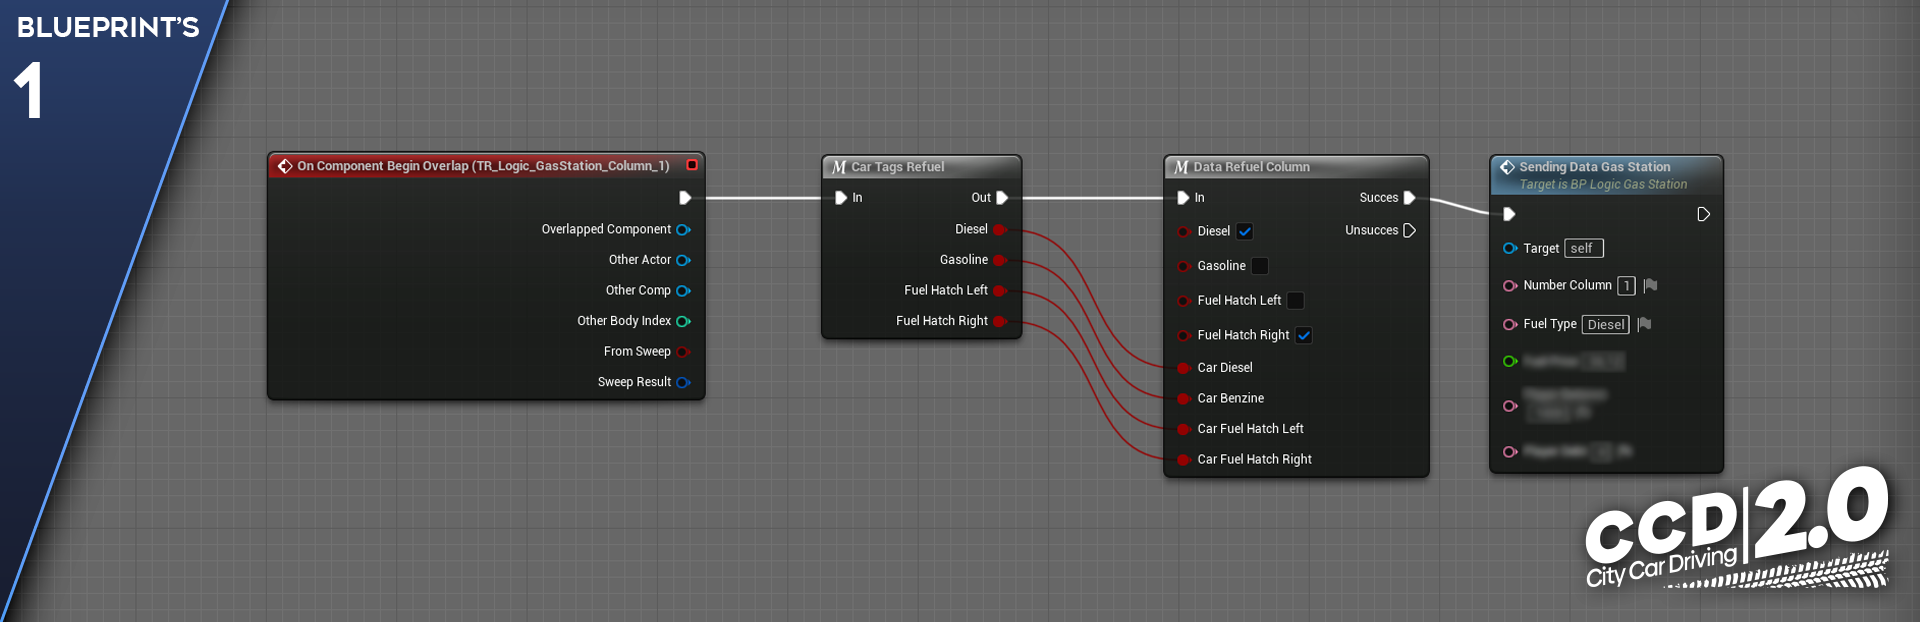
- The OnComponentBeginOverlap event is called when the player hits the trigger of the refueling column, further logic is triggered.
- The CarTagsRefuel macro receives data from the car, what type of fuel it has, and on which side it has a fuel tank hatch.
- The DataRefuelColumn macro receives data from the CarTagsRefuel macro and compares it with the specified parameters of the refueling column.
- The SendingDataGasStation function generates and sends all the data to the refueling logic.
- After the data is generated, the refueling script is initialized.
The script initialization has passed and the script has subscribed to the RefuelStatus event via the BindEvent to RefuelStatus node. Now, when this event is called from anywhere else, the event in our script will trigger. This is called Event Dispatcher.
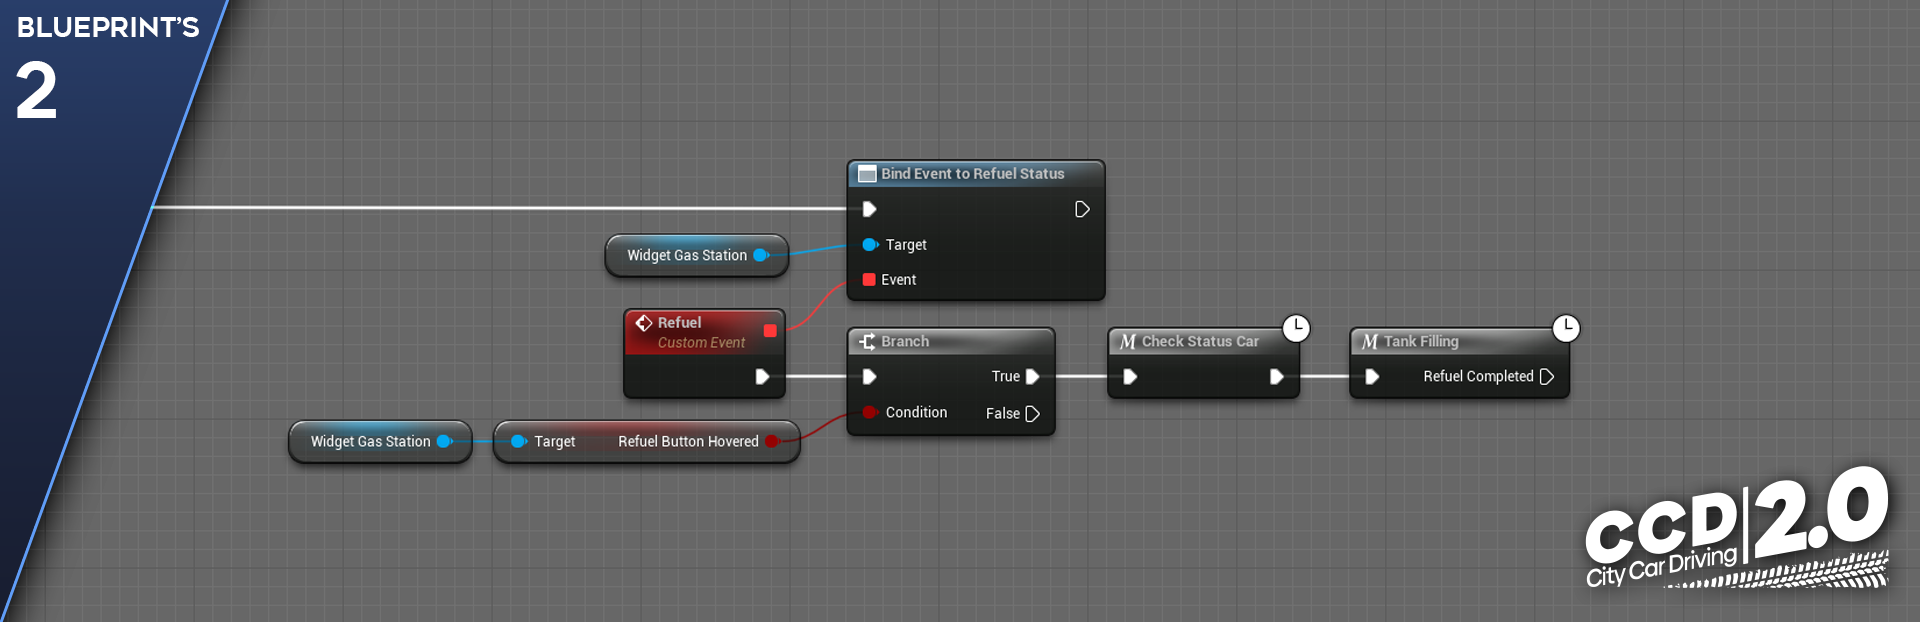
- As soon as the event to which the script is subscribed is triggered, the Refuel post-event is called and the chain of checks is started.
- First, the status of the RefuelButtonHovered variable is checked (whether the button is pressed or not) via the Branch node. This node checks whether the value being checked satisfies any specified conditions; in this case, it is checked whether the value of the RefuelButtonHovered variable is TRUE or FALSE. If the button is pressed, the check is successful because the variable returns True, and the chain continues.
Check is carried out via the CheckStatusCar macro, inside which the following is checked:
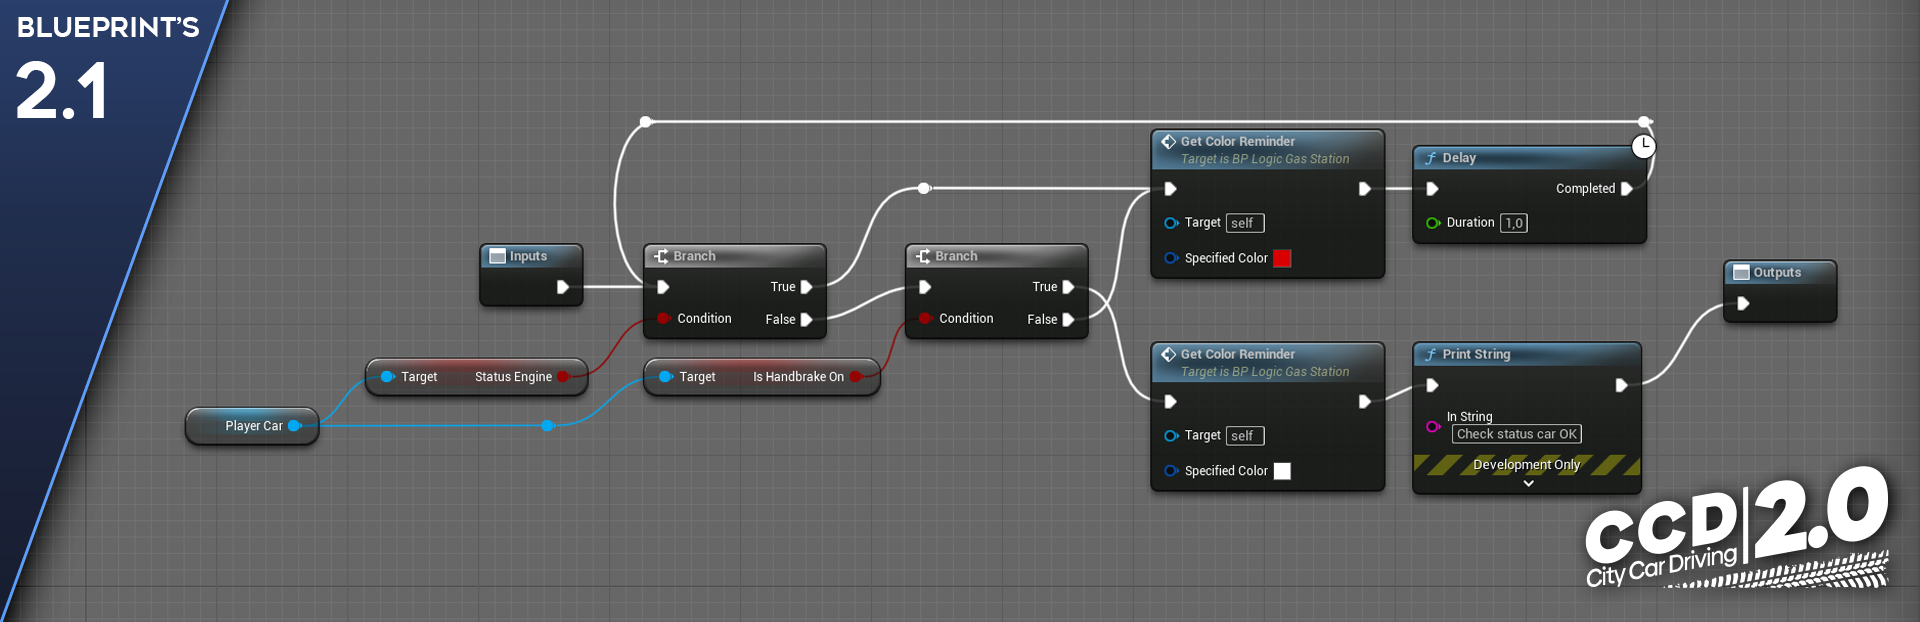
- The first two Branch nodes check whether the engine is turned off and whether the parking brake is activated. If this check is passed, the macro proceeds the script’s progress further.
- If the conditions are not met, the macro simply waits for the actions to be performed via the Delay node (time delay node).
Next comes the check and execution of actions via the TankFilling macro, inside which the following is checked:
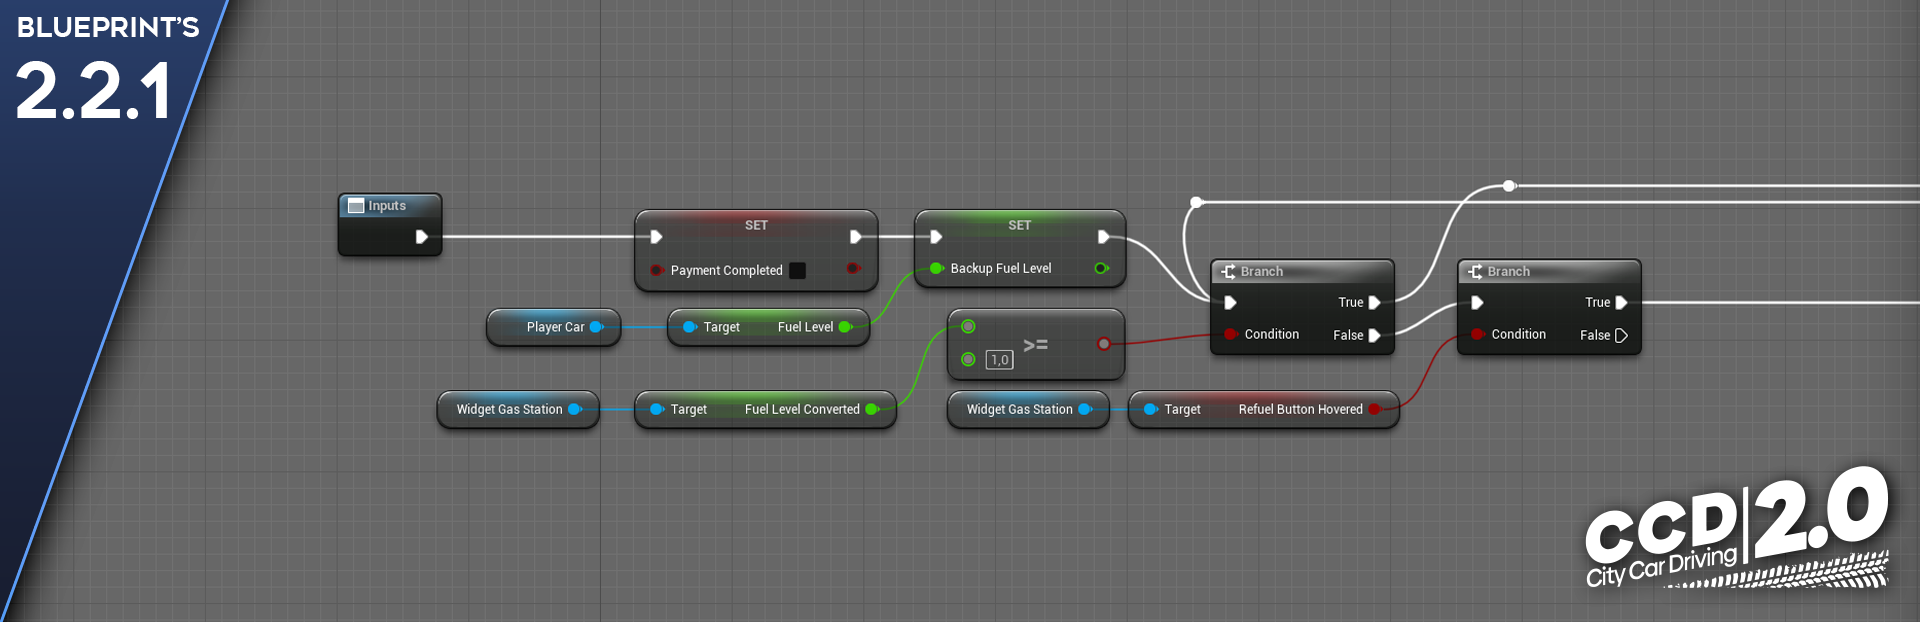
- The refueling confirmation variable is initialized and set to False. At this stage, our script is already ready to complete refueling.
- After that, the current fuel level is recorded in the BackupFuelLevel variable and stored there until the end of refueling.
- In the FuelLevelConverted variable, the tank filling level was previously formed into a decimal structure, i.e. the tank level is measured not in liters, but in fractions from 0 to 1. After that, via the Branch node, it is checked whether the tank has filled up to 1.
- Next, the script checks via the Branch node again whether the refueling button is still pressed.
After the previous checks, a number of execution units are launched, in which pure mathematical operations occur with a calculation interval equal to 0.1 seconds.
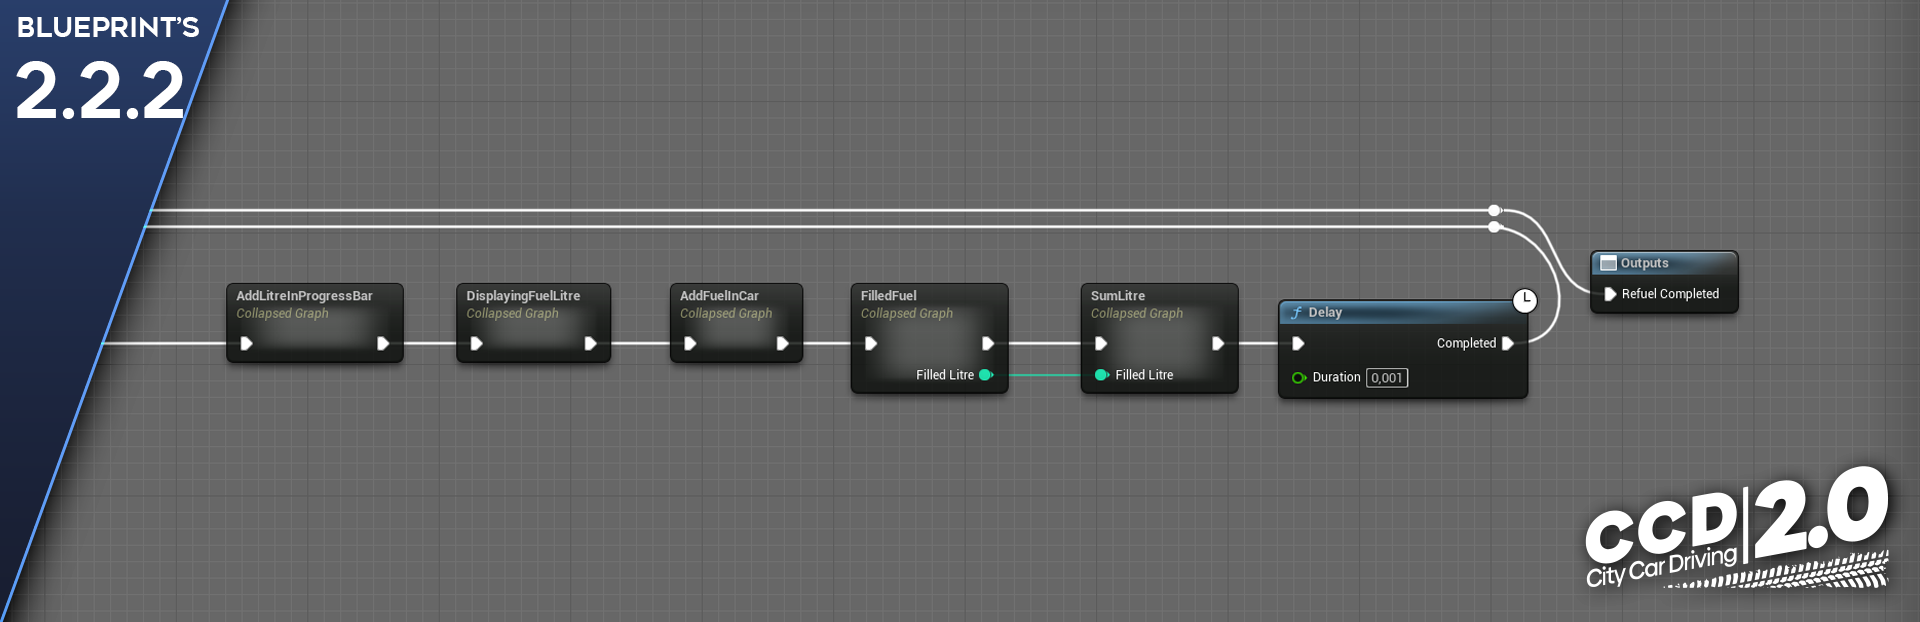
- The AddLitreInProgressBar unit animates the filling level of the tank inside the Refueling button. The current tank filling level value is summed up with the fuel supply flowrate.
- The DisplayFuelLitre unit sends the amount of refueled fuel to the user interface.
- The AddFuelInCar unit adds fuel to the vehicle’s tank. Every 0.1 seconds, 0.1 liters of fuel is sent to the tank level value.
- The FilledFuel unit calculates how much fuel the player has filled into the tank. The value of the previously set BackupFuelLevel variable is subtracted from the current tank filling level.
- The SumLitre unit generates and distributes refueling data, sends data to the refueling logic and to the logic of the car.
As soon as the player releases the refueling button, they have the opportunity to complete the refueling process and confirm the amount of refueled fuel. When the completion button is pressed, the confirmation logic is executed.
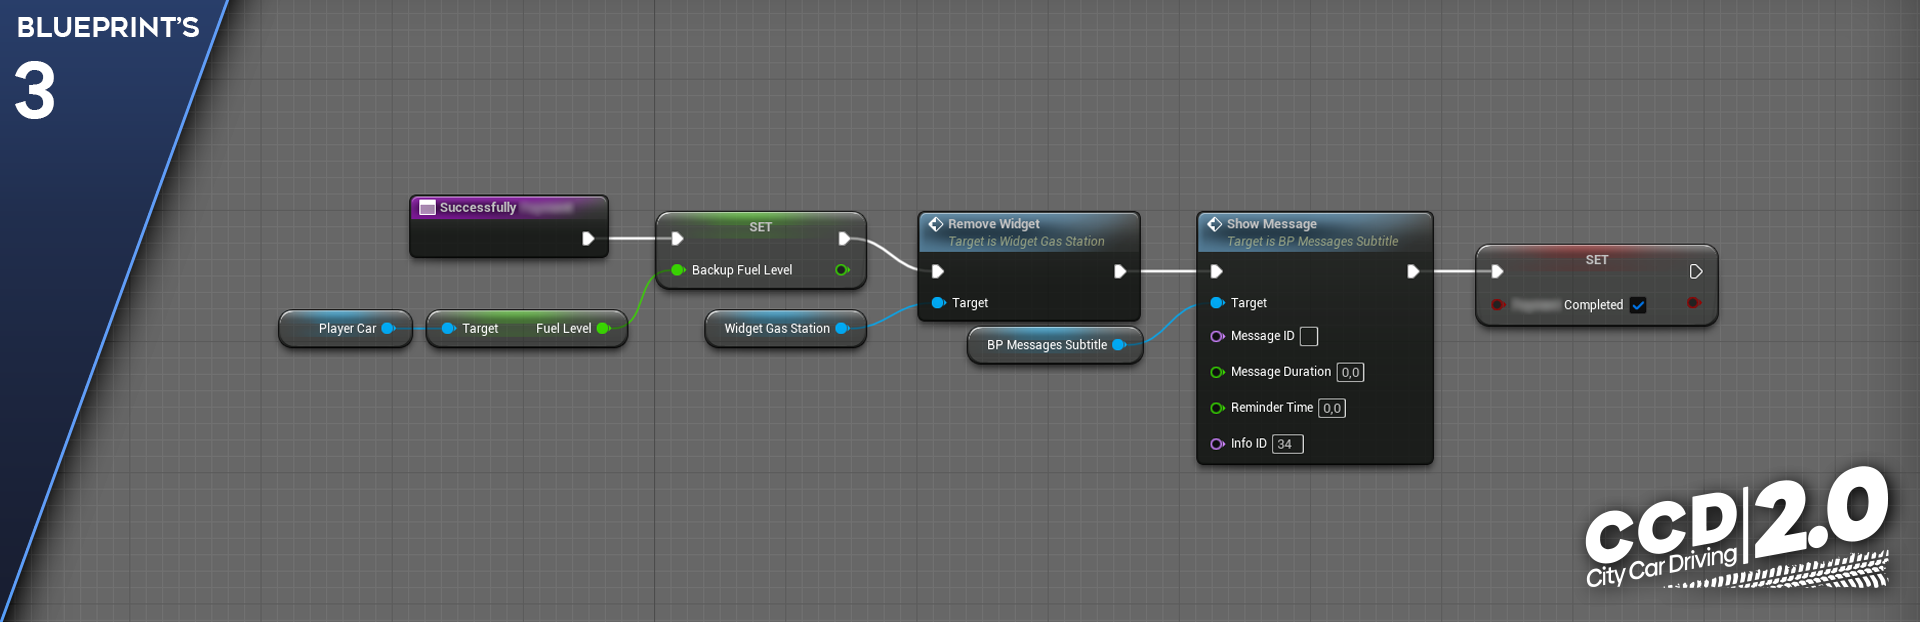
- A new tank level value is written to the previously set BackupFuelLevel variable.
- The user interface closes.
- A user message about successful refueling is issued.
How a Repair Station Works
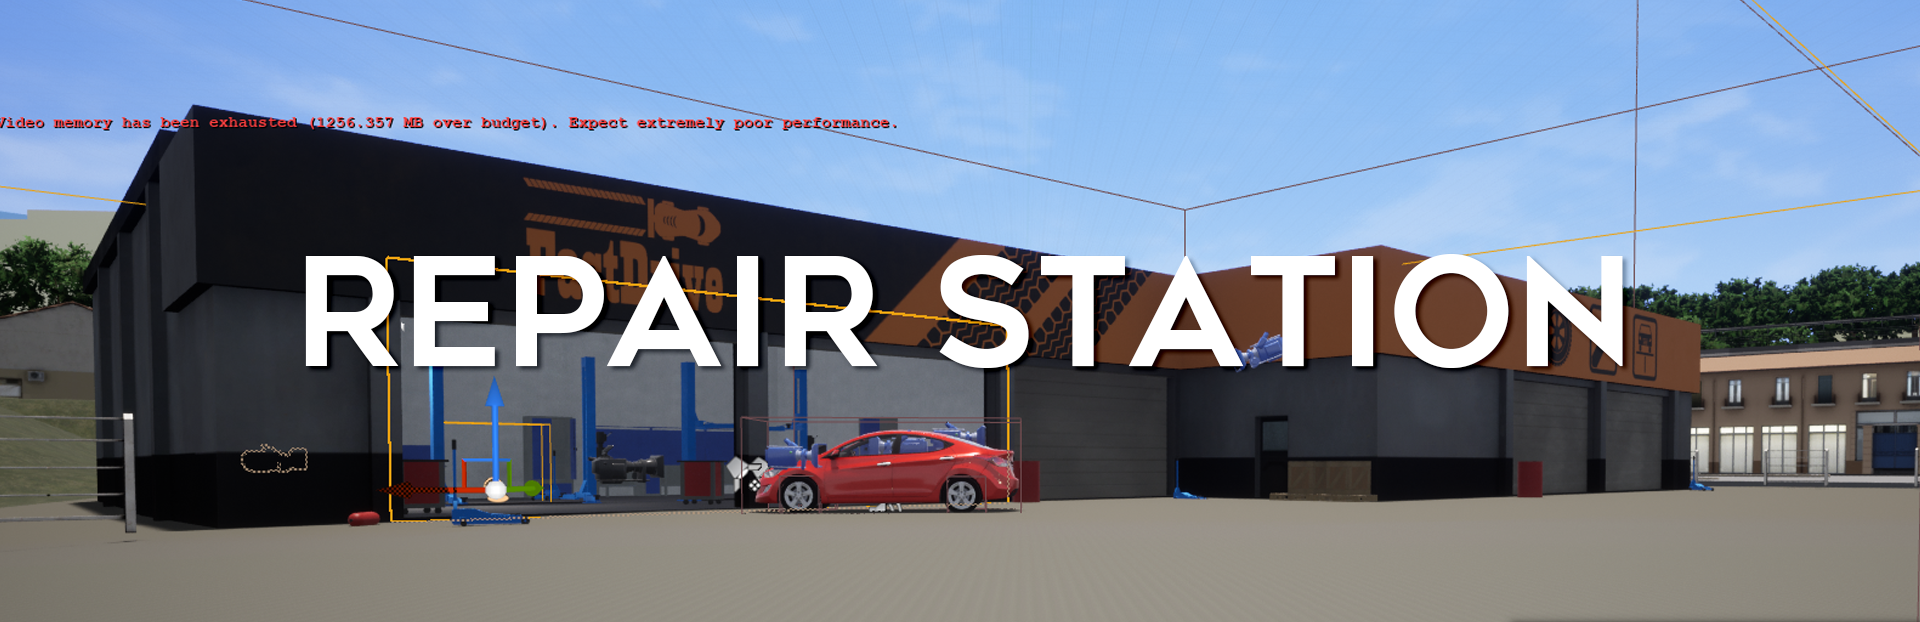
When a player enters the Service Station zone, the Service Station logic script is initialized.
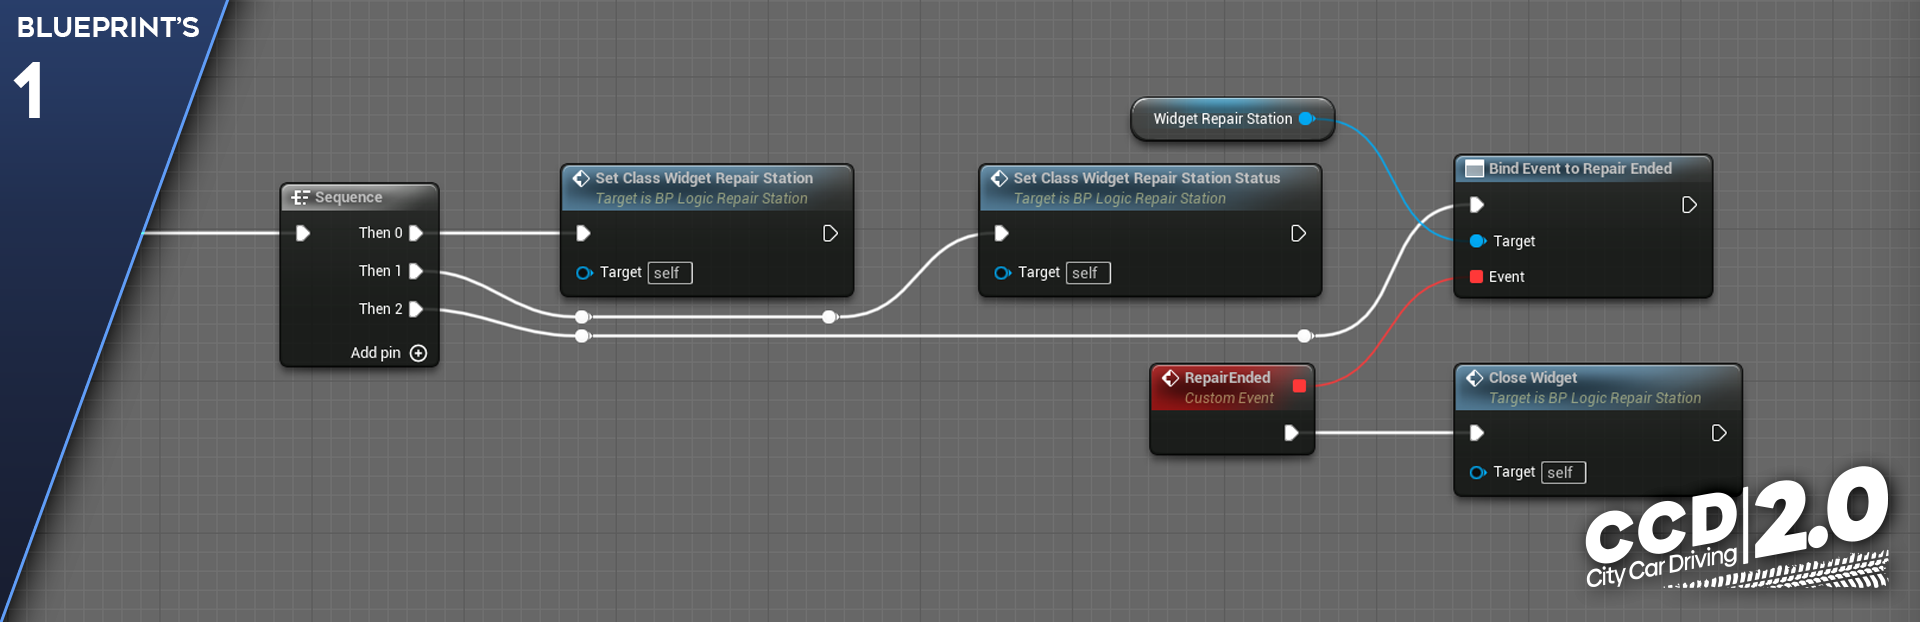
- The SetClassWidgetRepairStation function creates a link to the user interface class inside the Service Station.
- The SetClassWidgetRepairStationStatus function creates a link to the vehicle status class.
- The script subscribes to the RepairEnded event to receive the player’s exit from the service station event.
The player drove into the repair bay, the logic of collecting and generating data for use in further logic chains is triggered.
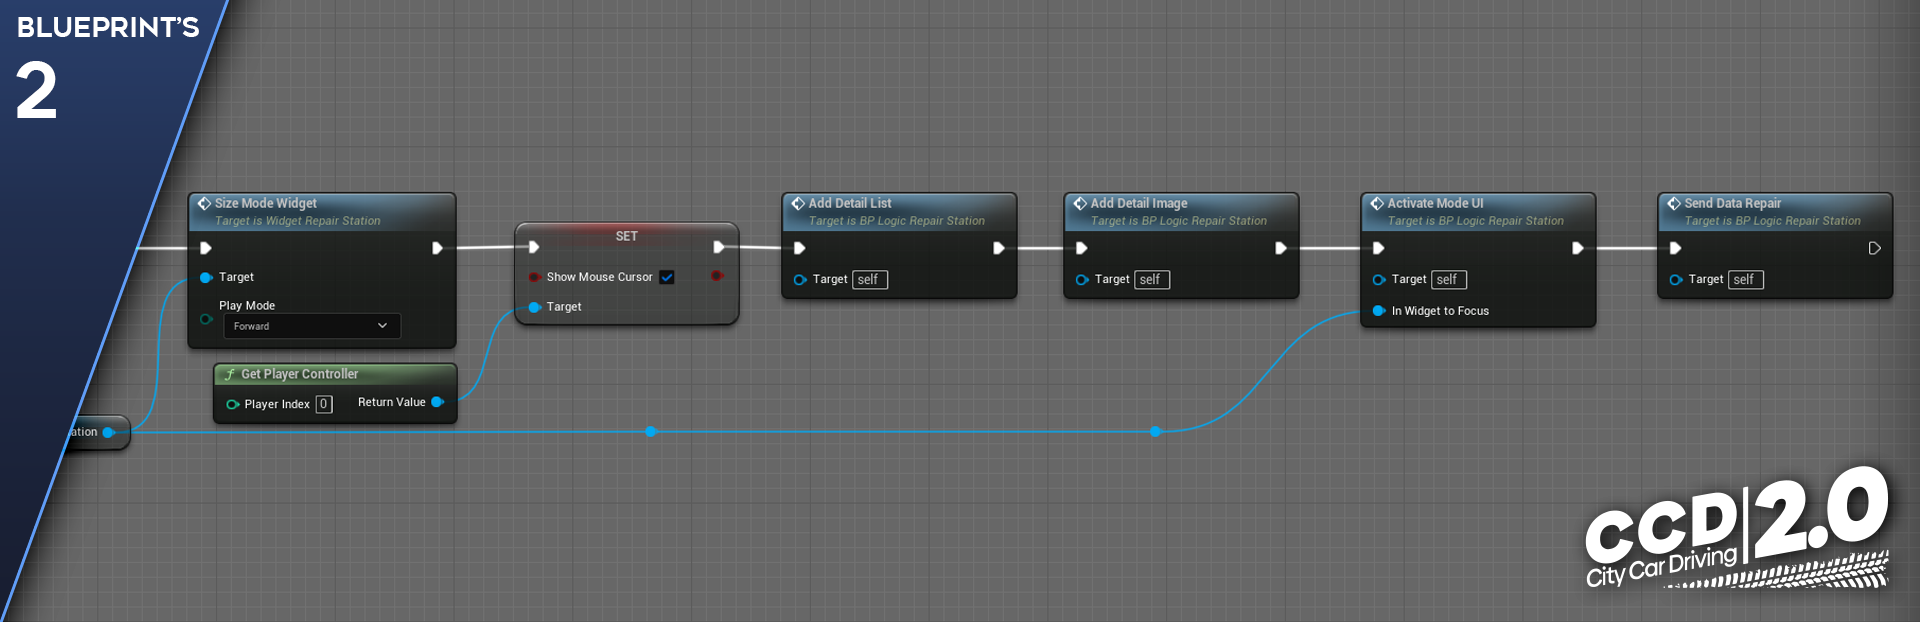
- The SizeModeWidget function starts the full access mode to the Service Station functions. Then we display the mouse cursor on the screen (the ShowMouseCursor variable is responsible for this).
Calling the AddDetailList event triggers a logic chain that forms and sorts car parts into the user interface.
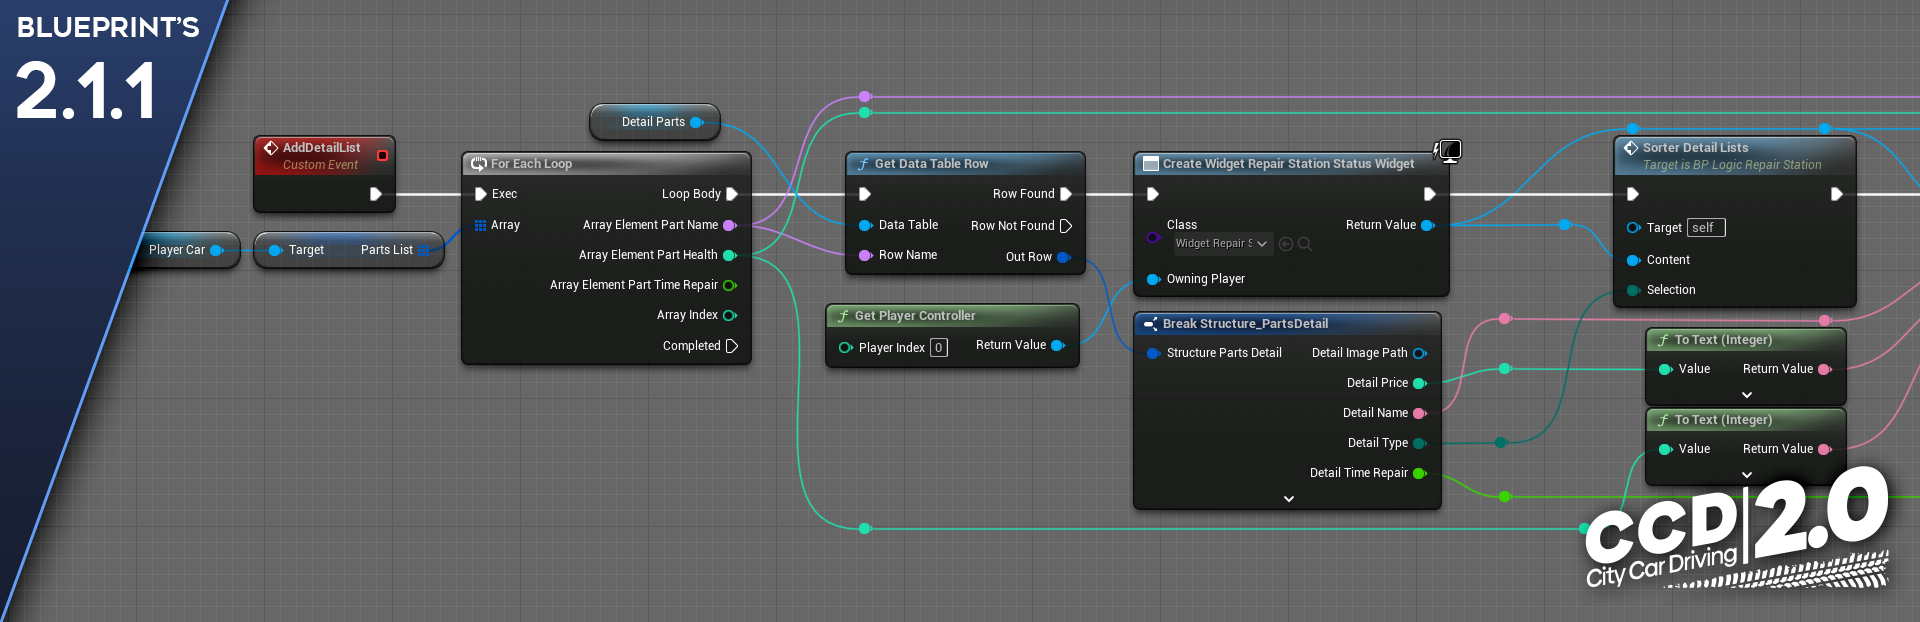
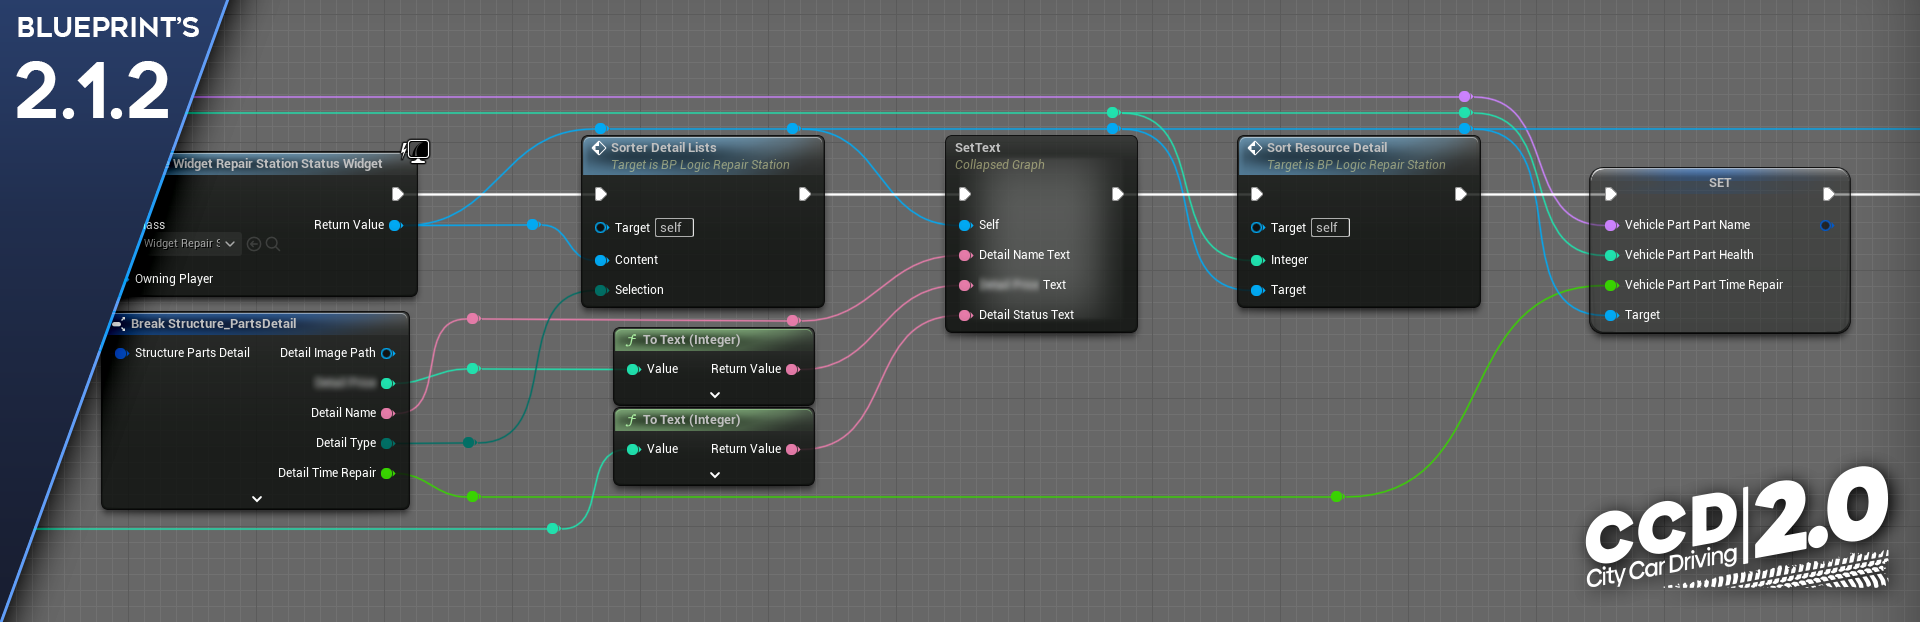
- Via the ForEachLoop structure, all values from the PartsList array are sorted. This is an array that contains a list of all of the car parts.
- Then, each part is divided into separate values, which in turn are sent along the required paths to the corresponding variable.
- The CreateWidget function creates an interface element to which the previously received values from the parts list are passed.
- Inside the SorterDetailList function, the received parts are sorted into different functional blocks: “Body,” “Chassis,” “Electrics,” “Engine.”
- The SortResourceDetail function sorts the parts list by their degree of wear.
- For further calculations for each specific part, the VehiclePart variable records data on the name of the part, the degree of its wear, and the duration of repair.
Calling the AddDetailImage event forms a unit of the car status visual display.
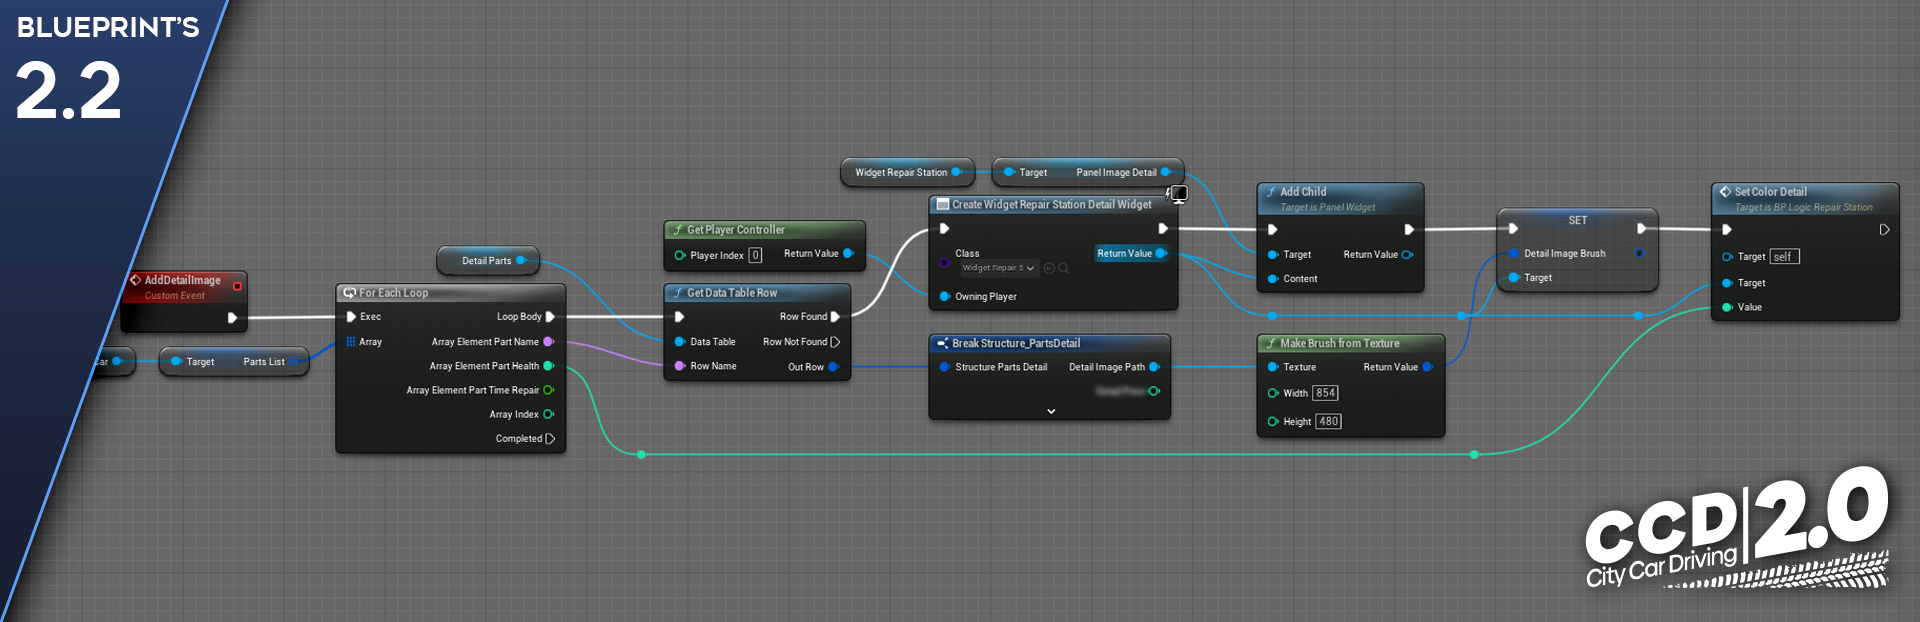
- Via the ForEachLoop , all the values from the PartsList array are being searched again.
- Then, from the data about the part, we get its image via the Break Structure_PartDetail structure.
- Via the addChild function, a new location is added in the user interface block to which the image is sent.
- We get the DetailImageBrush variable from the created location in the interface block, to which we send the previously received image.
- The SetColorDetail function sets the color of the sent image, depending on its wear and tear.
Calling the ActivateModeUI event activates the interaction mode with the Service Station.
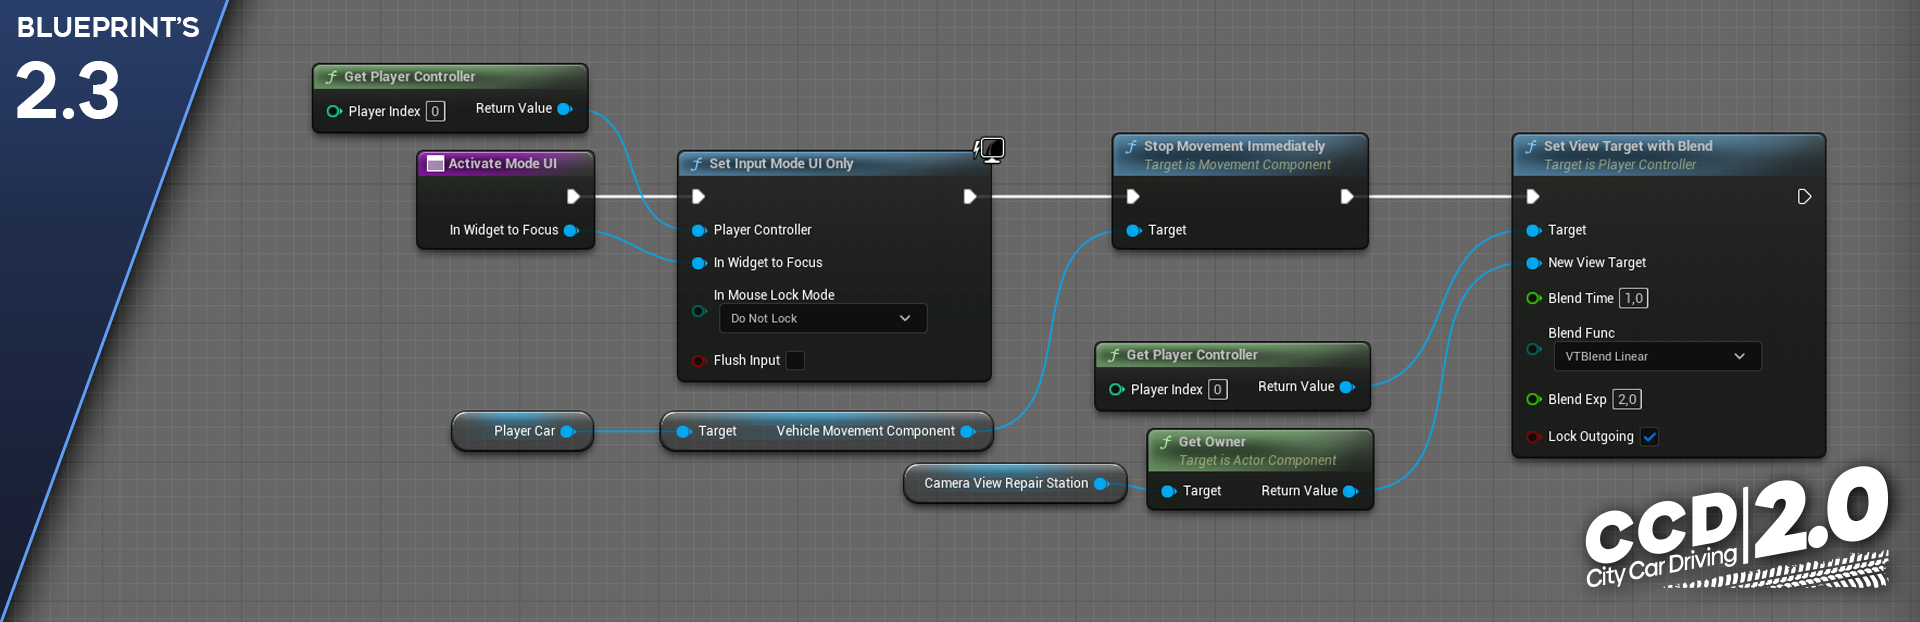
- The SetInputModeUIOnly function sets a condition under which the player can interact only with the user interface.
- The StopMovementImmediately function stops the physical simulation of the player’s car.
- The SetViewTargetWithBlend function changes the player’s surveillance camera. The current camera is turned off and switched to the Service Station camera.
The SendDataRepair event calls the SendingDataRepair function which sends data about the player, car, and parts to the user interface.
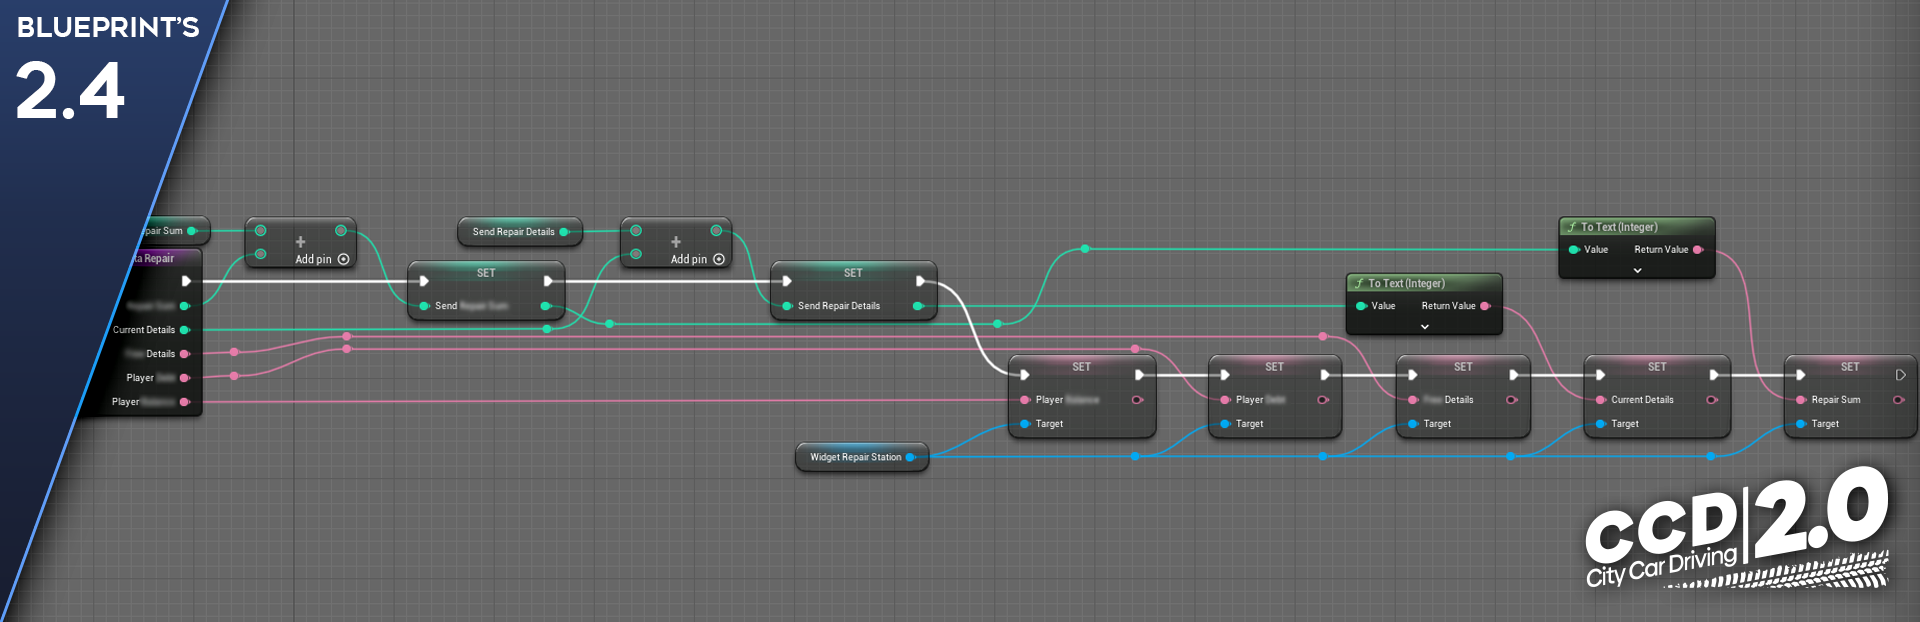
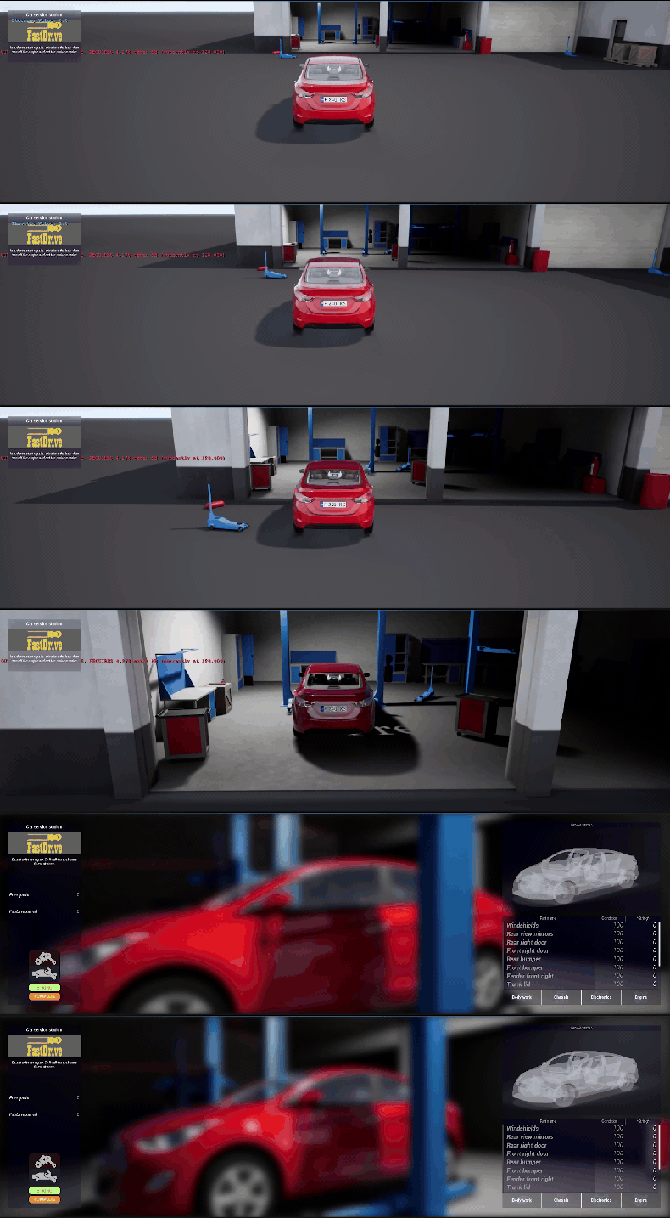
At the current stage, the player can fully interact with the Service Station, see the status of the car, check the integrity of the parts, repair each part separately, select several parts for repair, or repair all worn parts in one click.
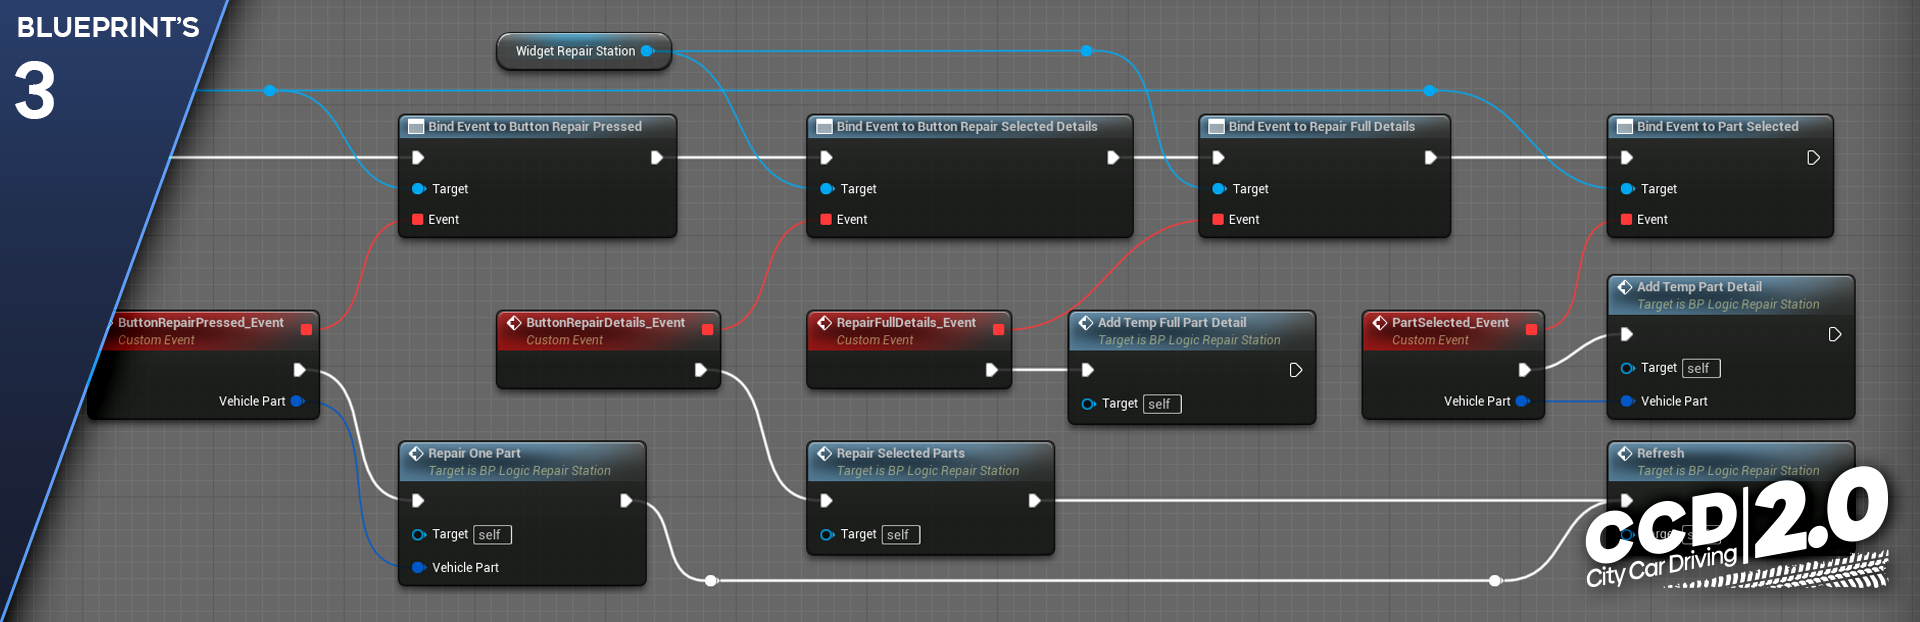
- The ButtonRepairPressed_Event event is triggered if the player has pressed the button to select a specific part. In turn, this event triggers the logic of repairing one part. Inside the logic, the selected part is checked and repaired, the wear value is reset.
- The PartSelected_Event event is triggered if the player clicked on a specific part once. The selected part will be recorded in the checklist for subsequent repair.
- The ButtonRepairDetails_Event event is triggered, if the player clicked on the Fix Selected Parts button. This event checks which parts were selected by the player when the PartSelected_Event event is triggered and performs a function similar to the function of repairing one part.
- The RepairFullDetails_Event event is triggered, if the player clicked on the Repair All Parts button. The logic will check all the parts and find those whose resource is below 90 %. Then all these parts are sent to the repair function.
After the repair is completed, the player can leave the Service Station. In this case, the script will execute a number of final logics:
- Closes the Service Station mode. The player can no longer interact with the user interface of the Service Station.
- Clears temporary variables.
- Clears the part lists and parts data.
How a Car Wash Works
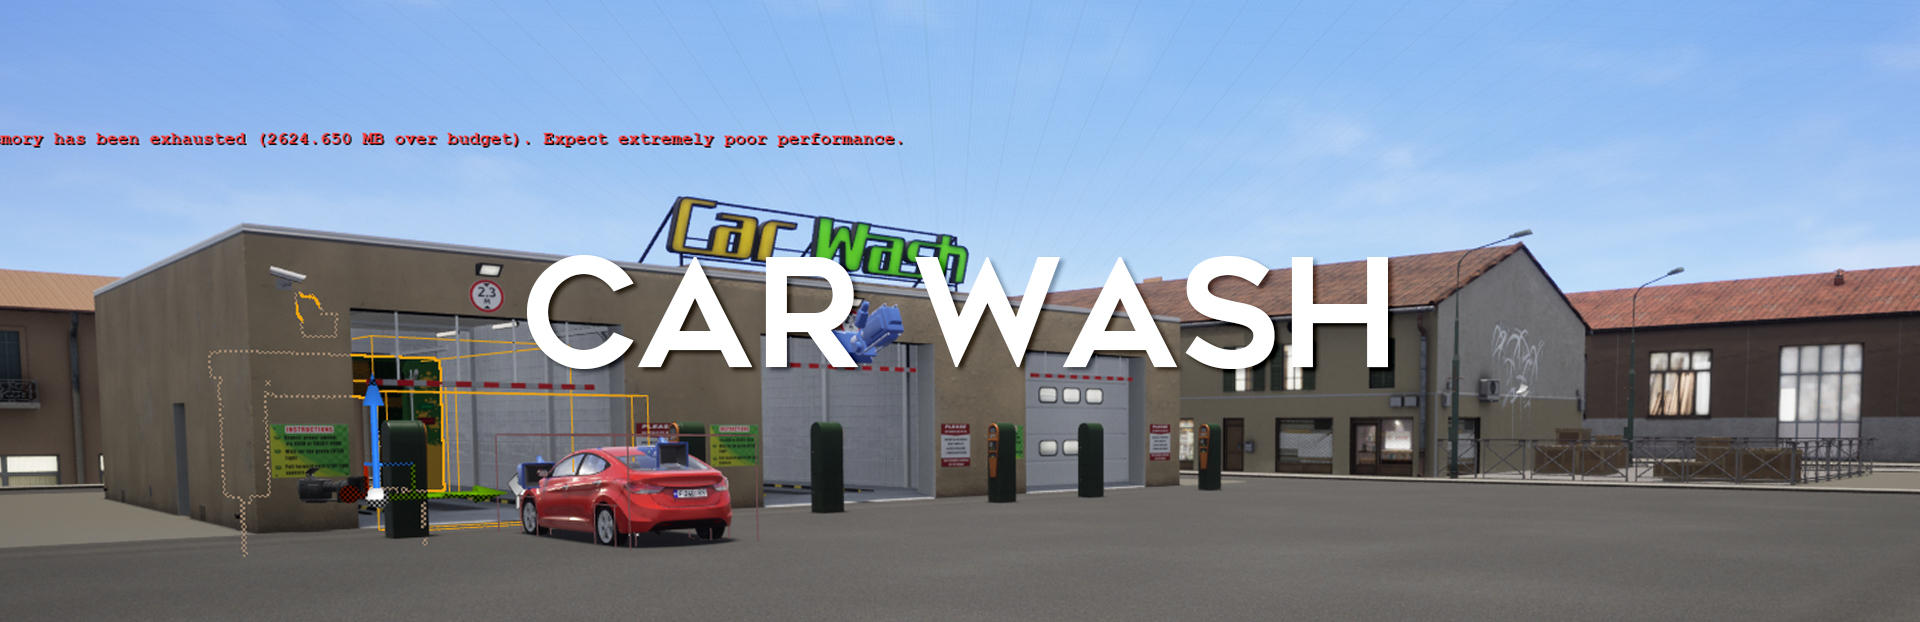
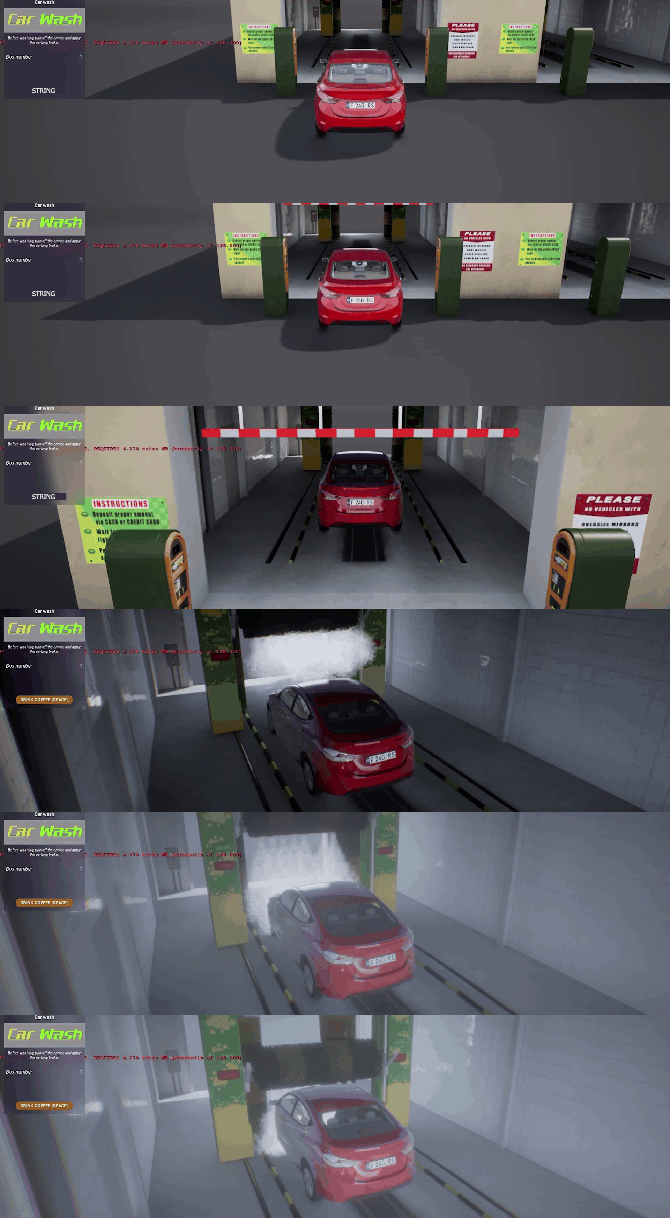
The script initialization system at a Car Wash is identical to the rest of the interactive objects. As soon as the player drives up to a Car Wash and presses the interaction confirmation button, the gate opens and the warning lights light up. At this stage, the Car Wash is waiting for the car to get into the washing bay.
We implemented a beam tracing system in the Car Wash instead of animations prepared for each car. This allows you to unify the work logic, regardless of the type and shape of the car. In fact, with this implementation, the logic works correctly with absolutely any object that gets into the washing bay. Invisible beams track the shape of the body and control the movement of all mechanisms.
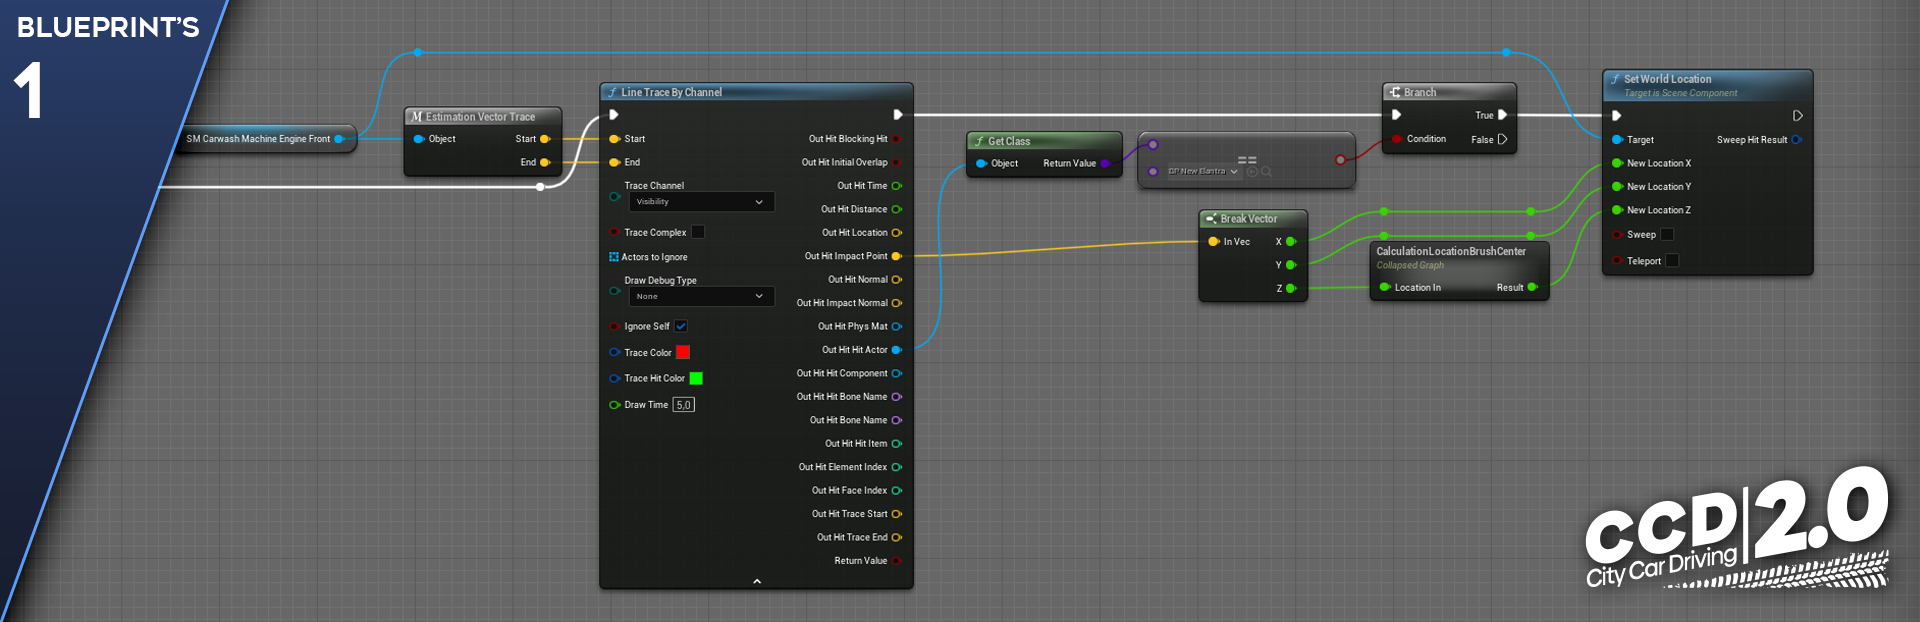
- The EstimationVectorTrace macro calculates the length of the beam that will track the shape of the car body and also checks the radius of the brush so that the brush geometry does not intersect with the car geometry.
- The LineTraceByChannel function “shoots” a beam to track the point of its intersection with the car body geometry, after which it sends the coordinates in which the intersection occurred further.
- The SetWorldLocation function receives the intersection coordinates and moves the brush to this point.
Beam tracing is used in the logic of all movable mechanisms of the washing complex:
- Washing brushes
- Washing machine
- Drive with washing nozzles
Also, at the Car Wash, there is an opportunity to skip the car washing process: for this, we have added the opportunity to drink coffee.
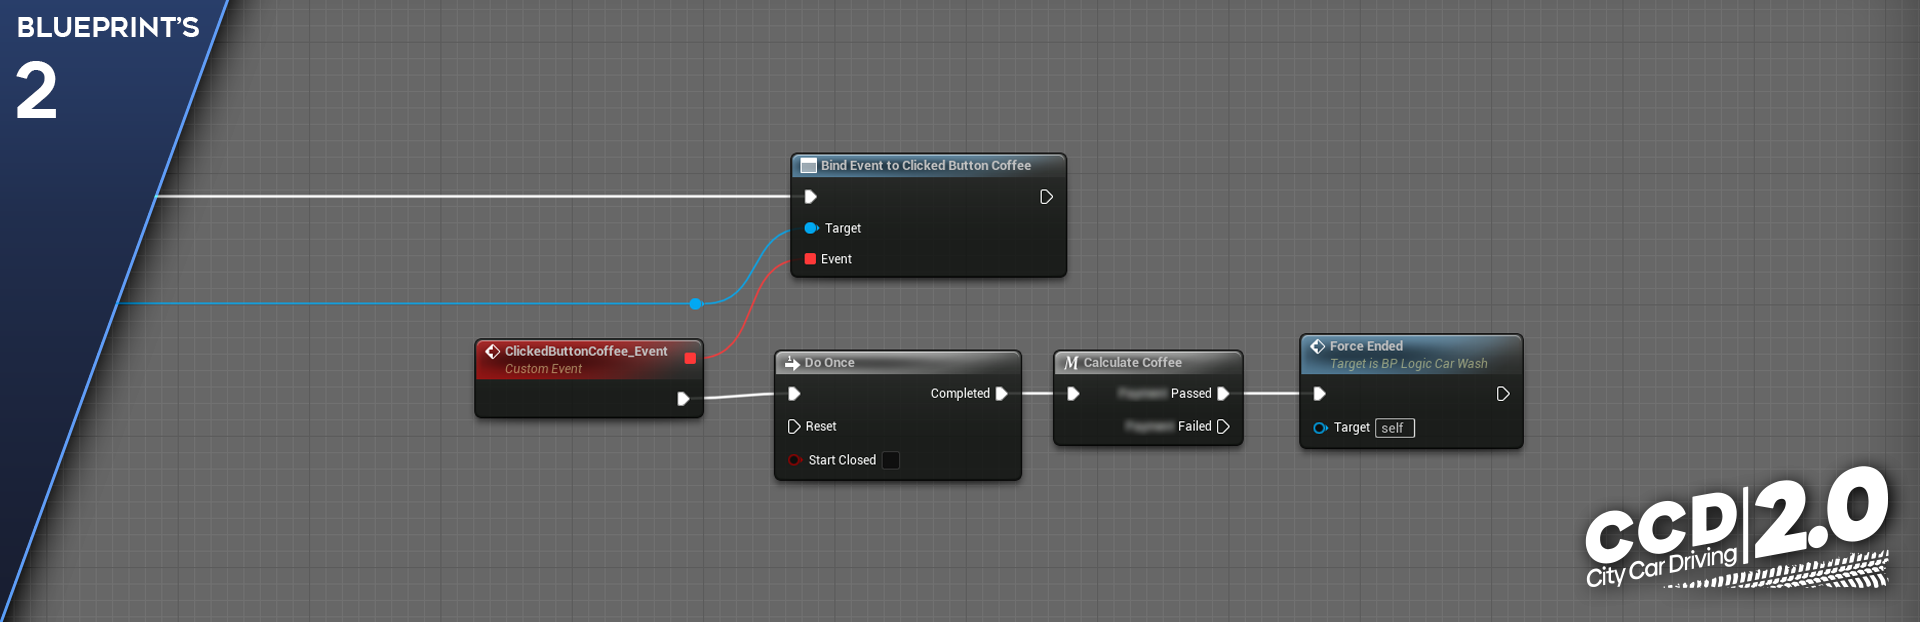
- The ClickedButtonCoffee_Event event is triggered when the player clicks on the Drink Coffee button.
- The DoOnce operator will execute the logic once, without being able to press the button again during the current washing session.
- The CalculateCoffee macro calculates the possibility of wash skipping.
- After receiving approval from the macro, the ForceEnded event is called, the execution of which starts the process of wash skipping. The screen is darkened, the brushes return to their original position, the washing bay is turned off.
After the car wash is completed, the body contamination degree is reset, the gate opens. The player can now continue the game by leaving the washing bay.
How the Garage Works
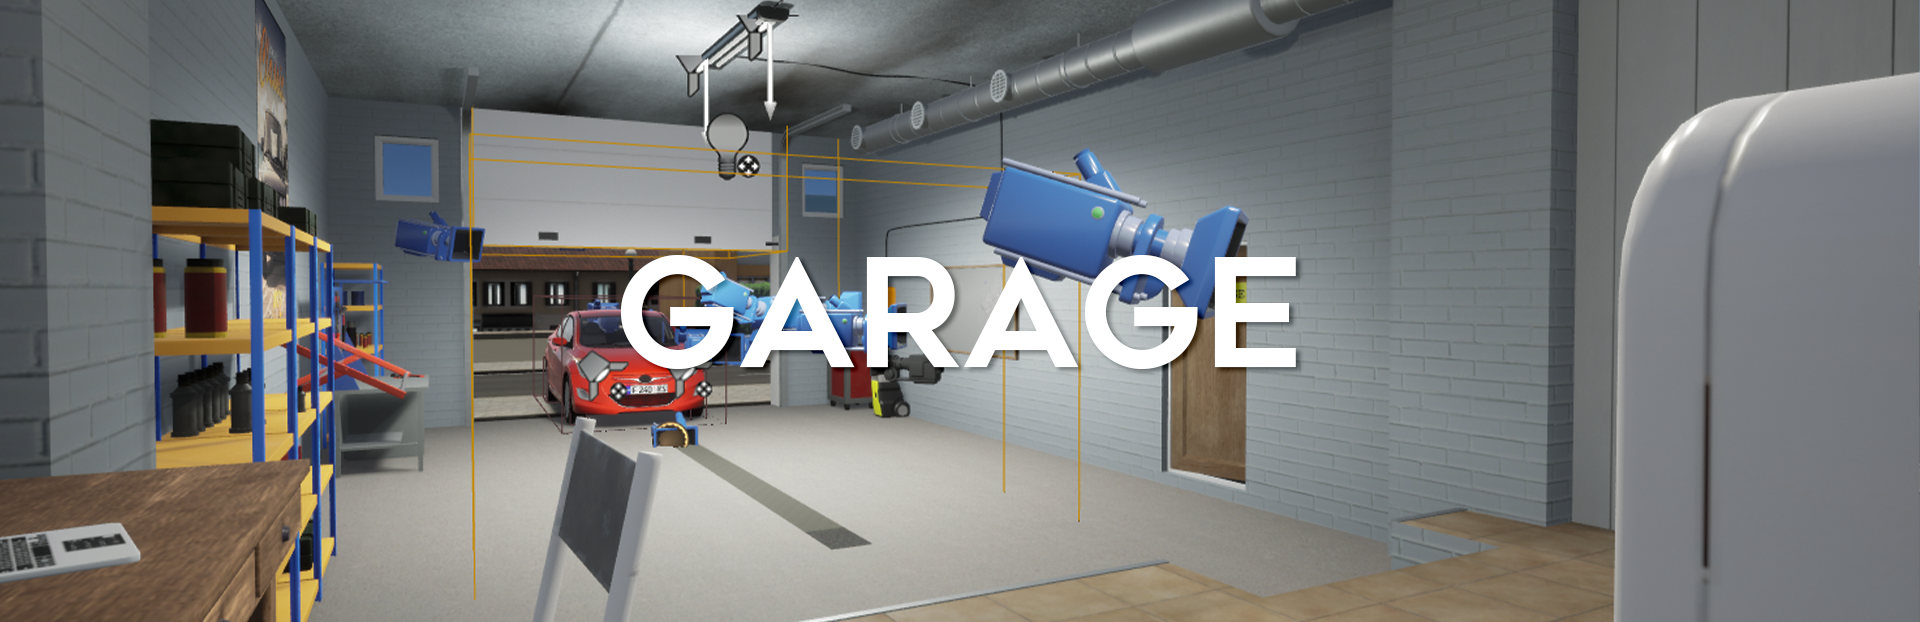
The Garage is the only place where, when entering the zone, the player must complete a full stop
- of the vehicle, namely:
- activate the hand-brake;
- turn off the headlights;
- shutdown the engine;
- unfasten seat belts.
This is implemented as follows:
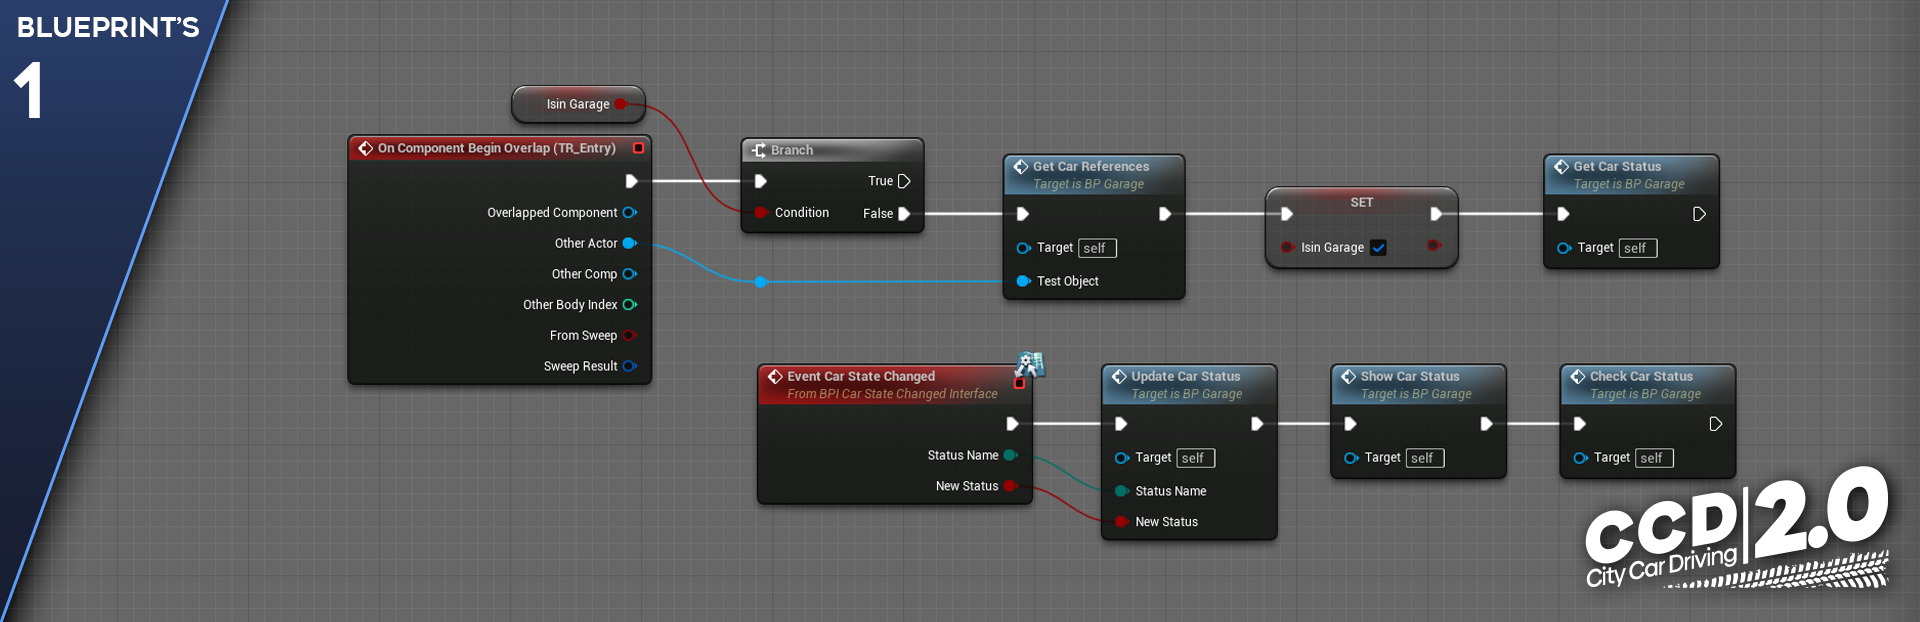
- At the entrance to the Garage, the player has a widget with a list of necessary actions. Blueprint gets a link to the car and also checks its initial state.
- When a car’s state changes, it transmits via the interface what parameter it has changed and to what value.
- After that, the widget marks the new state of the car and checks whether the player has fulfilled all the conditions.
- And if all the conditions are met, the main logic of the garage starts.
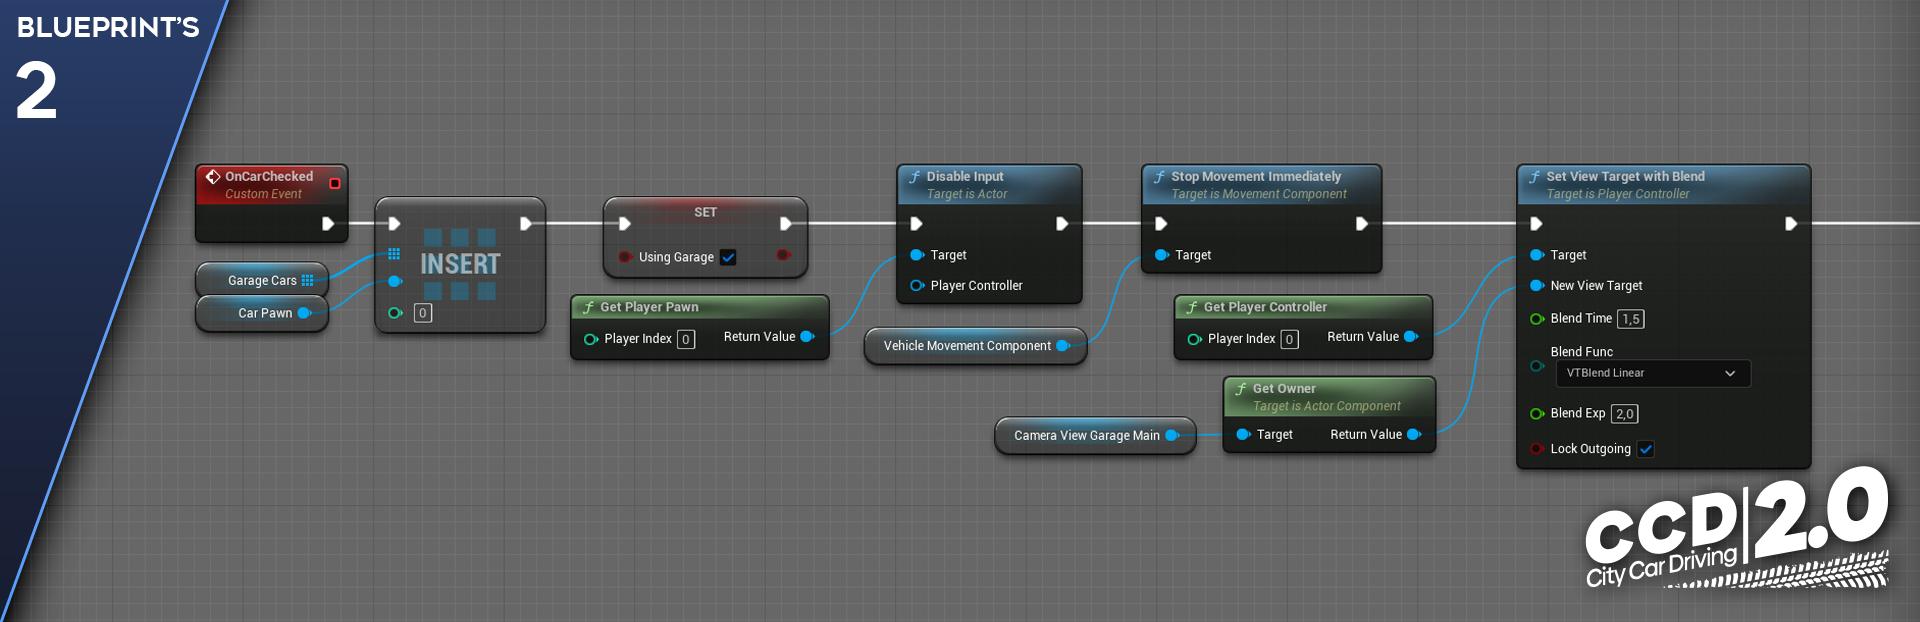
Here, the player’s car is added to the garage’s array of cars (under the zero index), and the player themselves gets the opportunity to use the garage’s functionality.
Bed: allows you to rewind time by calling a function in a separate class that controls time at the level.
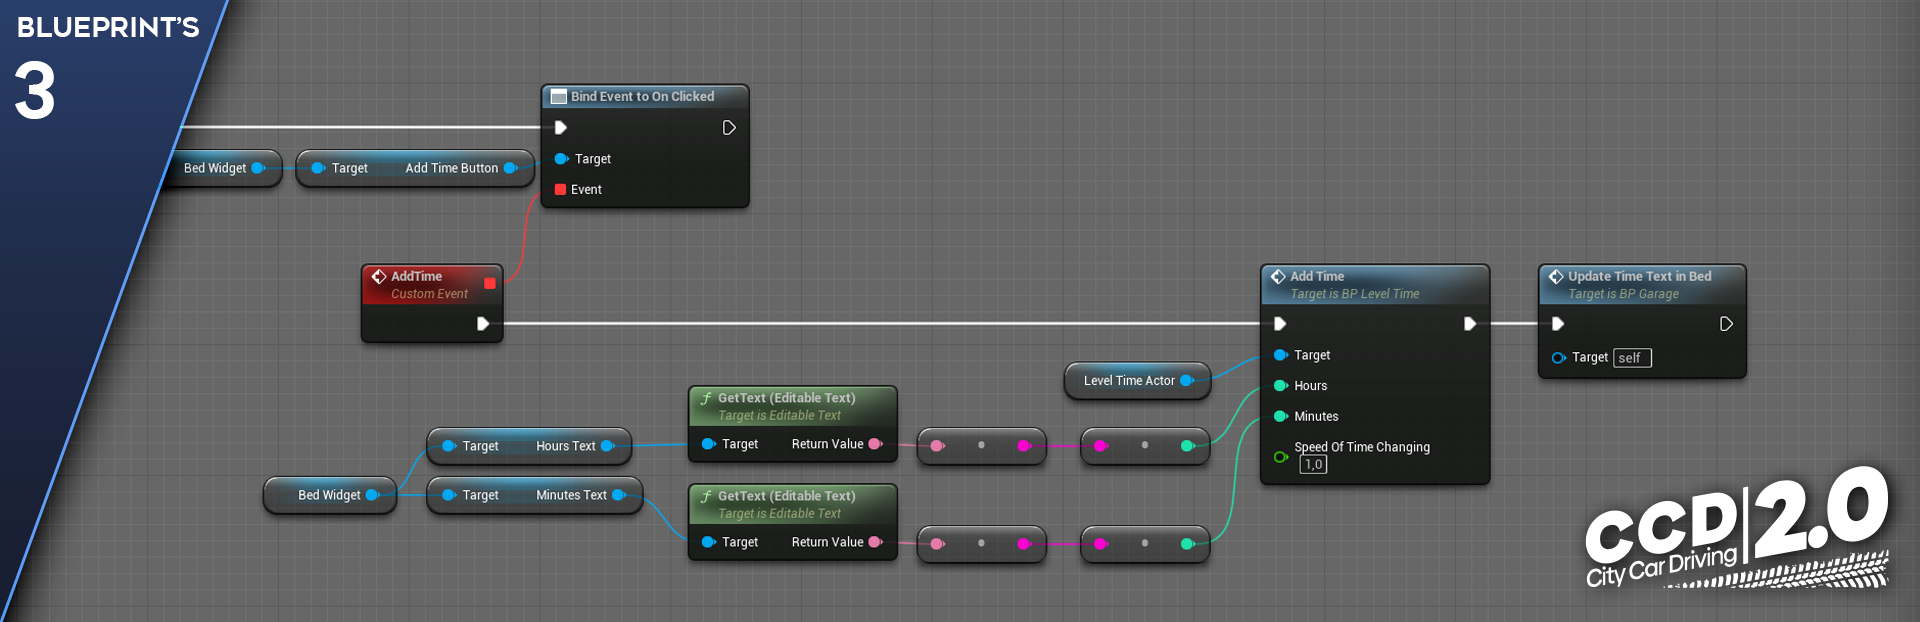
- AddTime is a function in the LevelTime class that adds time to the current state that the player specified in the widget.

In the next issue, we will not talk much and will prepare for you a set of screenshots of the project for the entire time of its development.
Developer Diaries are published every two weeks. Don’t miss them!